Guide
How to Sync a Supplier Product Feed with Shopify
Last updated: 19 September 2026
A manual supplier update means downloading a CSV, fixing its columns in Excel and uploading it to Shopify again. Repeat the same job after every feed change.
Skip a week and prices go stale. A renamed supplier column can also break the import while the old stock remains visible to customers.
If a wholesaler, brand or dropship partner gives you a CSV feed, Pro and Scale let you schedule it without downloading a new file each day. Prices and stock update from the source. New products can be handled by a separate scheduled import.
This guide covers:
- What a supplier sync actually needs to do
- The four common ways merchants handle it and where each breaks
- The criteria for a good sync setup
- A step-by-step walkthrough of setting up automated supplier sync with Simple CSV on Pro or Scale, including matching, scheduling and monitoring
- Real-world scenarios with example schedules
- The tricky cases - authentication, discontinued products, file formats and limits - handled honestly
If your supplier's feed is a one-time import rather than an ongoing sync, the guide to importing products with CSV covers that scenario. This guide is for a feed that changes and needs to run again.
What "Sync" Actually Needs to Do
Before picking a tool, it helps to be clear about the four jobs a supplier sync handles. They're not the same job and they don't all need to run at the same time:
- New products appear in the feed. The supplier added 30 SKUs last night. You want them in your store with images, descriptions and prices.
- Existing prices change. A brand raised wholesale prices by 8% across the board. Every product you sell from them needs the new price reflected.
- Stock levels change. The supplier sold a batch to another retailer and is down to two units of a popular SKU. Your store should show "2 in stock" before someone orders ten.
- Products disappear from the feed. A SKU is discontinued. The supplier silently drops it. You probably don't want to keep selling it, but you also don't want it auto-deleted from your catalog without a check.
The first three jobs benefit from automation because they are frequent and predictable. The fourth is an architectural decision that needs a deliberate answer. The limitations section returns to it.
The Four Ways Merchants Handle Supplier Sync
There's no single right answer. The right choice depends on the supplier's feed format, the size of your catalog and how much engineering you want to own.
Manual download -> upload. Open the supplier's portal, download the CSV, save it, open Shopify, click Import. Works for the first few weeks, then becomes the chore that doesn't get done. One missed update can cost more in oversells than the entire automation would have cost.
Shopify's built-in CSV importer. It is free but cannot fetch from a URL, run on a schedule or map a supplier's columns to Shopify's columns. For a one-off catalog import it is fine. See the guide to importing products with CSV. For ongoing sync, it is the wrong tool.
Custom Shopify development. A developer wires the supplier's feed directly into Shopify's API. This can work well when the feed format is stable, but every supplier change creates more development work. It makes sense for very large stores with unusual requirements and costs too much for most daily price updates.
Full ERP, PIM or dropship platform. These platforms cover much more than a CSV import and often charge per SKU or order on top of a base fee. Many merchants need a small part of the feature set but pay for all of it.
A focused CSV sync tool. Right answer when the feed is CSV, sits at a public URL and you want a scheduled setup without an enterprise stack. This is where Simple CSV fits on Pro or Scale.
If your supplier's feed is XML or JSON instead of CSV, this article still covers the workflow, but you'll need a different tool for the actual sync. Inventory & Price Sync handles XML and JSON feeds.
What You Need from a Supplier Sync Setup
Use these eight criteria to evaluate any supplier sync setup, including the one you'll build below:
- URL-based imports - no manual download step
- Scheduled execution at a known time
- Column mapping, so the supplier's headers don't have to match Shopify's
- Match by SKU, barcode or product ID when Handle is not suitable
- Choice between create-only or update-only on a per-schedule basis
- Pre-flight preview before a run touches the live store
- Logs with row-level detail
- Backup integration before destructive runs
A URL import without scheduling still needs a manual run. Scheduling without column mapping depends on the supplier keeping every header unchanged. Row-level logs show exactly which SKU failed.
Setting Up Supplier Sync with Simple CSV
The walkthrough uses a wholesale supplier that publishes a CSV feed at an HTTPS URL and updates it once each night.
Step 1 - Get your supplier's feed URL
Ask the supplier for a feed URL. Most B2B portals offer one - sometimes called a "stock feed," "product feed," or "data export URL." It should be publicly accessible over HTTPS and return a CSV file when you open it in a browser.
If your team maintains the feed in a spreadsheet, you can also publish a Google Sheet as a CSV URL and use that as the scheduled source on Pro or Scale.
- HTTPS only. Simple CSV doesn't fetch from FTP or SFTP. If your supplier only offers FTP, ask whether they have an HTTPS option or set up a small mirror script that pulls the FTP file every morning and serves it from your own HTTPS endpoint. For larger setups this is a one-line cron job to a static file host.
- Authentication. If the URL requires a username and password, use basic auth in the URL itself:
https://username:password@example.com/feed.csv. API key headers, OAuth and signed URLs aren't supported - for those, the same mirror-script approach works. - Test the URL in a browser in private mode, so your saved credentials don't disguise a problem. If the file downloads cleanly there, Simple CSV can fetch it.
Save the URL - you'll paste it into the import step.
Step 2 - Choose your import strategy
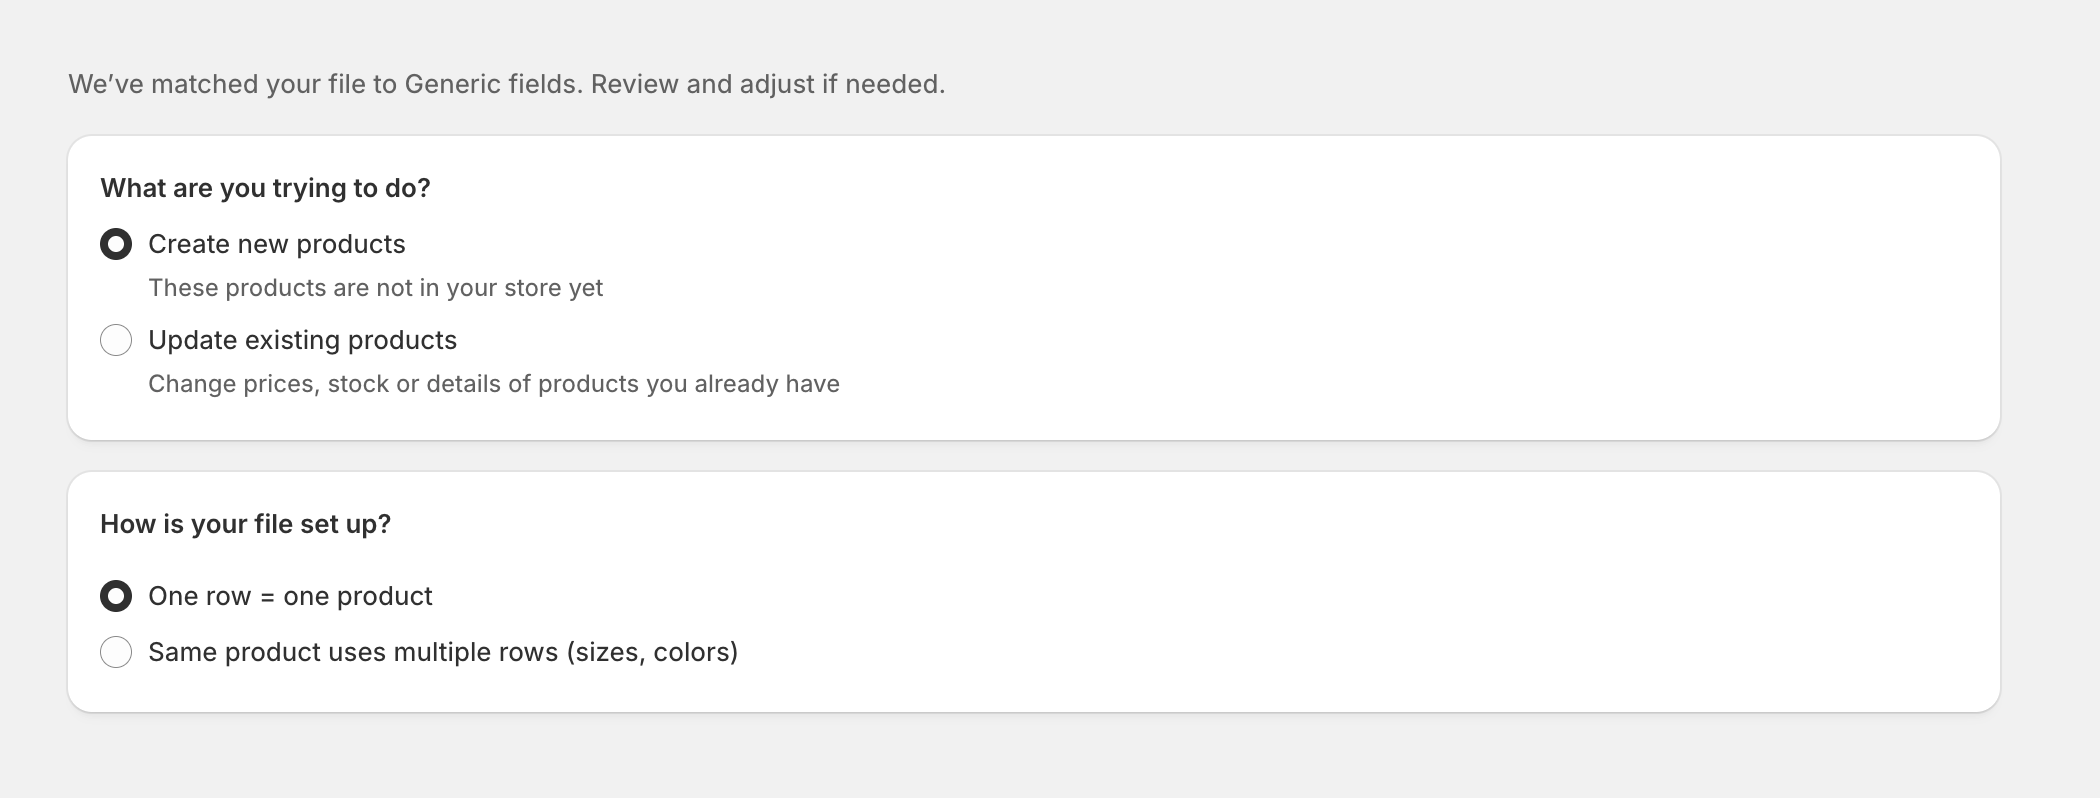
When you start a new import in Simple CSV, first choose to create new products or update existing ones.
- Inventory and price refresh. Update existing products only. This processes fewer fields and avoids re-creating products you've manually customised.
- Adding new products from the feed. Create new products. On Pro or Scale, run this on a separate schedule from the price and stock update.
The second choice on this screen - whether one row equals one product or whether the same product spans multiple rows - depends on whether the supplier's feed contains variants. Most B2B feeds use one row per SKU.
Step 3 - Map your columns
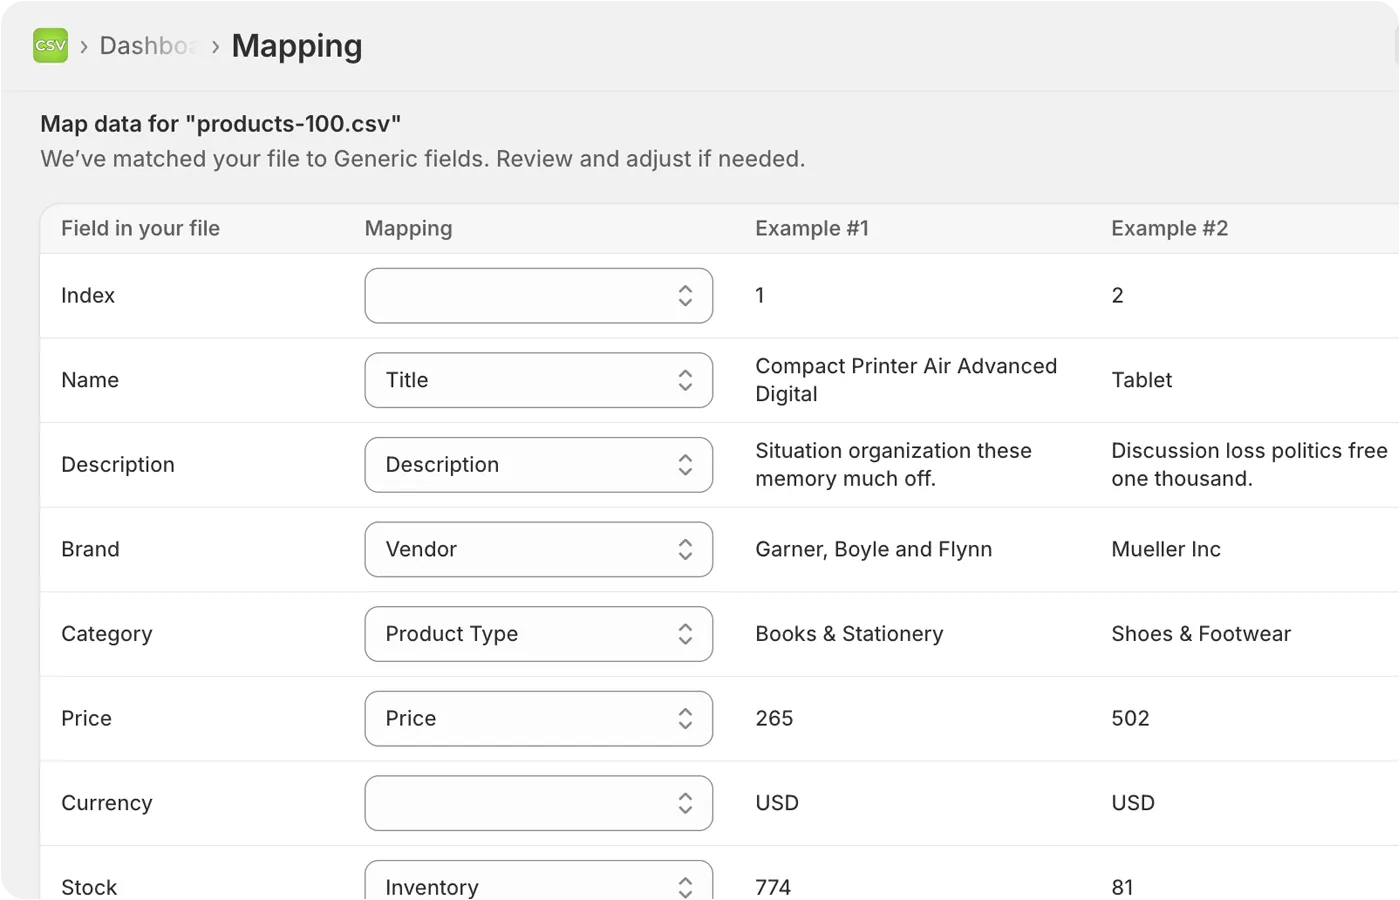
Suppliers rarely use Shopify's column names. A feed may contain headers such as OFFERID, NAME, PRICE_OLD and WEIGHT, sometimes in another language.
Simple CSV reads the supplier's headers and proposes a mapping. You confirm or change each field. Up to five examples per column show the actual data in the feed (scroll horizontally to see them all) so you can spot a wrong guess immediately - for instance a column labeled OFFERID that actually contains a 13-digit barcode rather than a Shopify product ID.
For a typical supplier feed, the fields that matter are:
- The match key, usually SKU
- Price and Compare-at price if the feed has both regular and sale prices
- Inventory quantity
- Title, description and images - usually only on the create side, since you may not want supplier title changes overwriting your edited Shopify titles
On update runs, map only the fields you actually want changed. If you've spent time rewriting the supplier's terrible default titles, don't map the title column on the daily update. The supplier's "Premium Quality 100% Pure Set 3-Pack" doesn't need to overwrite your "Outdoor Wood Care Set" every morning.
Step 4 - Choose how products are matched
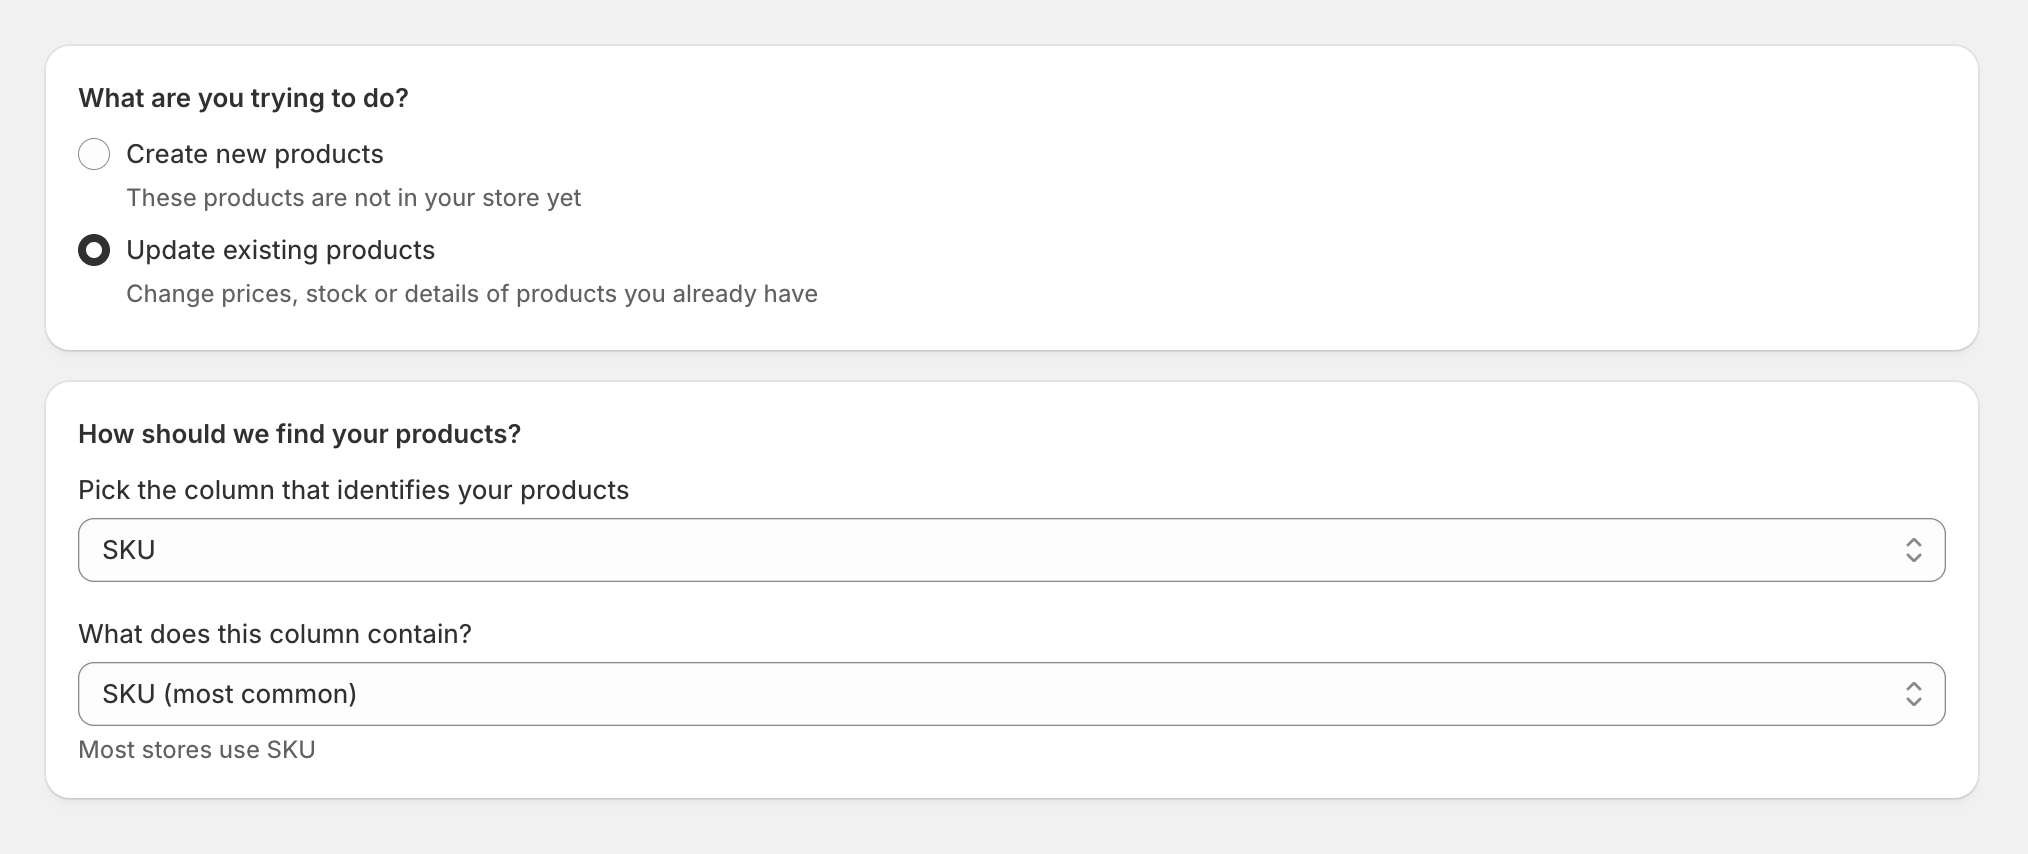
For an update run, the most important decision is how Simple CSV figures out which row in the supplier's feed corresponds to which product in your store.
- SKU - the default and the right answer for most supplier feeds. Stable across renames and URL changes. Use this unless you have a specific reason not to.
- Barcode - useful when the supplier provides UPC/EAN/GTIN consistently but doesn't share consistent SKUs.
- Product ID - Shopify's internal numeric ID. It is rare in supplier feeds and almost never the right choice.
- Handle (URL) - the product's URL slug. Fragile because handles change when titles change. Avoid for supplier sync.
SKU, barcode and handle matches are exact, case-insensitive and ignore surrounding spaces. A supplier value of SF-2000-SET cannot update SF-2000-SET-CP. If an exact SKU or barcode exists on more than one product, Simple CSV skips the row and records the number of matches in the import log instead of choosing a product.
Match by SKU. The exception is large dropship setups where the supplier publishes barcodes consistently and SKUs are derived per-retailer.
Step 5 - Review the summary before running
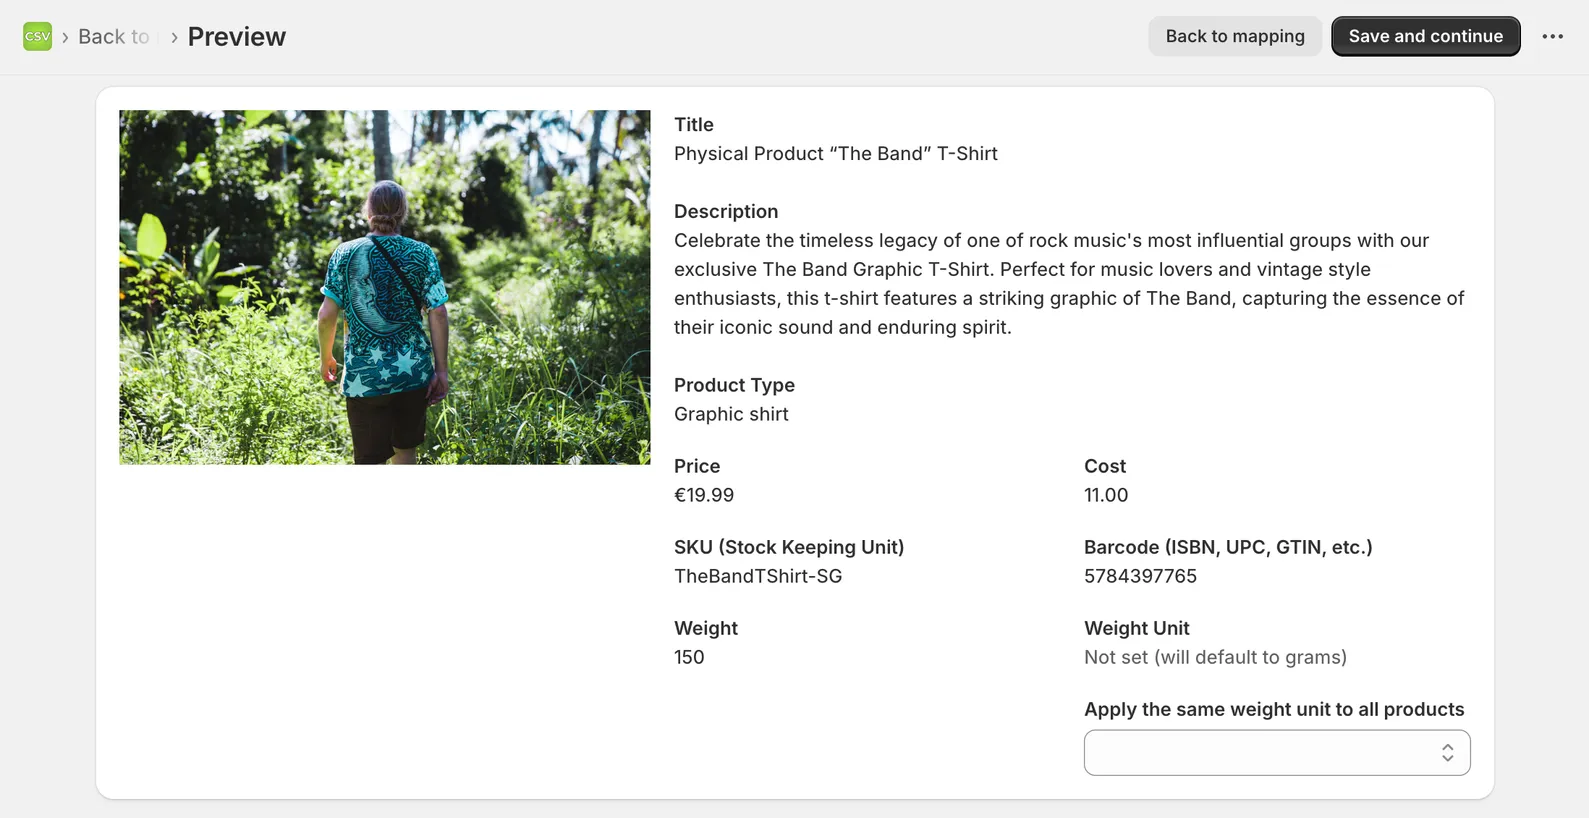
Before any run touches your live store Simple CSV shows a pre-flight summary. A full preview of the data being changed is shown for imports of new products. For updates the summary tells you the row count, the source file or URL and the match key.
Read this screen. The number of rows tells you whether the feed is the size you expected - a feed that's suddenly 12 rows when it's normally 4,000 is a sign the supplier's export broke. The match key reminds you what's being used to find products.
The "Create backup now" link is worth using before any large update. Image changes in particular can't be reversed cleanly and a backup taken sixty seconds before a sync gives you a clean rollback path. Simple CSV integrates with the free backup app for this.
From this screen, choose Start update to run it once. On Pro or Scale, choose Schedule to run it later.
Step 6 - Schedule the recurring sync
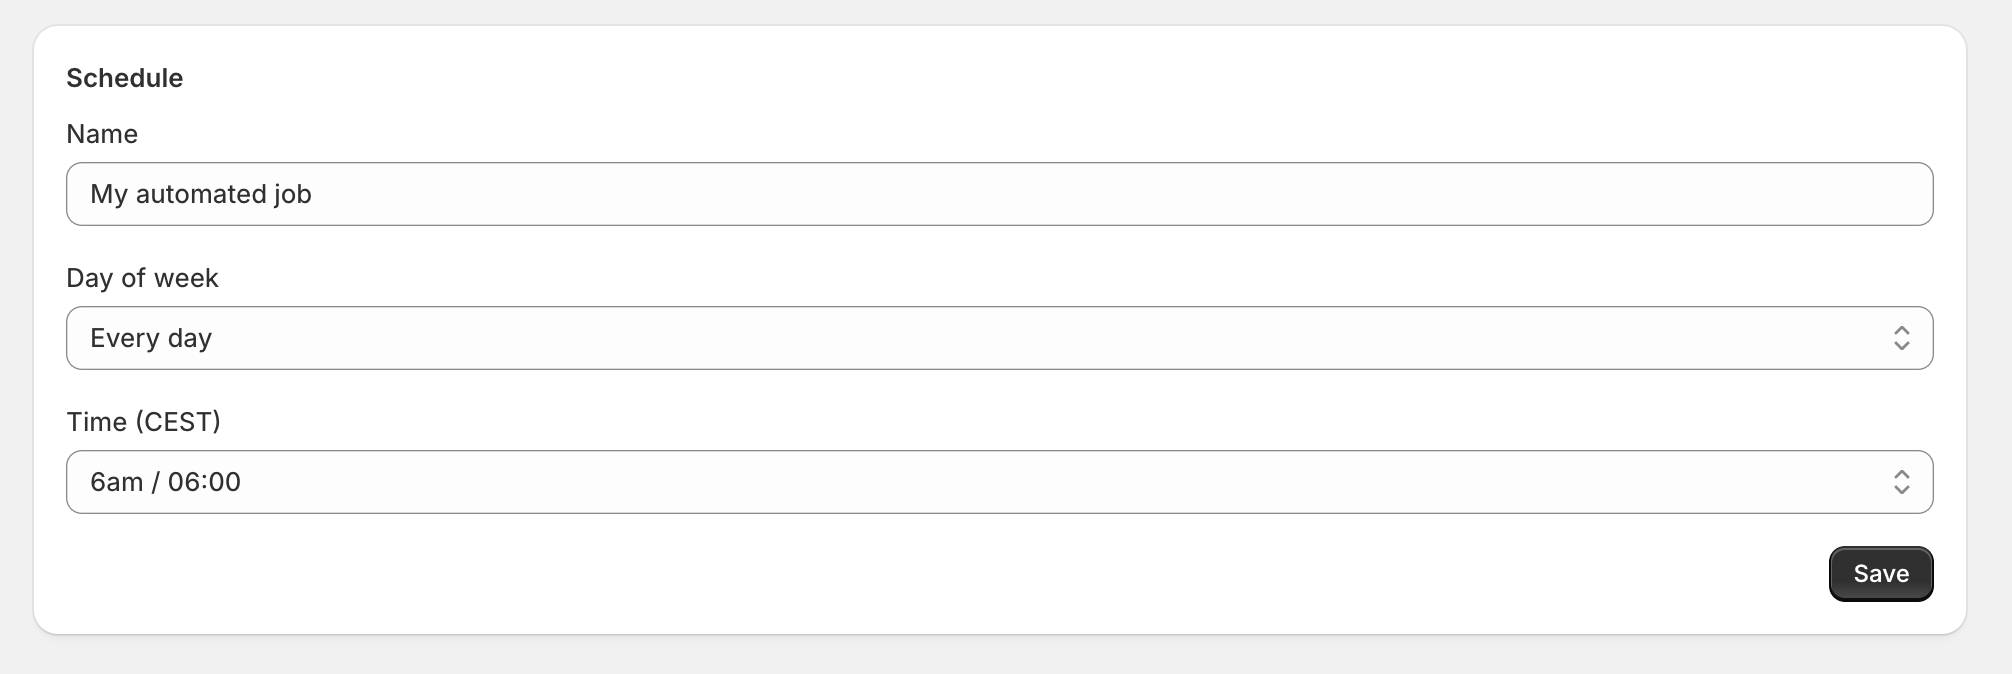
Saving the import as a Pro or Scale schedule removes the manual run.
A Pro or Scale schedule has three fields:
- Name - anything that helps you recognise this run later, such as
Supplier A - daily stockorBrand X - weekly price - Day of week - every day or a specific weekday
- Time - the hour to run, in your local timezone
Choose the supported cadence for each automation. Pro automations can run as often as every 6 hours, while Scale automations can run hourly. Pro supports up to 3 automations and Scale supports up to 7.
- Run before your shop's peak hours. If most of your traffic is 9 AM onward, schedule the sync for 4 AM. Fresh data is live before customers arrive and the sync doesn't compete with checkout traffic for API capacity.
- Run after the supplier's update. If the supplier publishes their daily feed at 2 AM their time, schedule yours for at least an hour after, accounting for timezone differences.
- Run separate schedules for create and update. Each schedule has one strategy, either create new products or update existing ones. For most suppliers this means two schedules. One adds new products and the other refreshes prices and stock. Two narrower schedules are easier to debug than one combined run.
Step 7 - Monitor
Once a Pro or Scale schedule is live, you check on it through two screens.
The Recent imports list shows every manual run and every scheduled Pro or Scale run with its current status - Completed, In progress, Scheduled or Not completed.
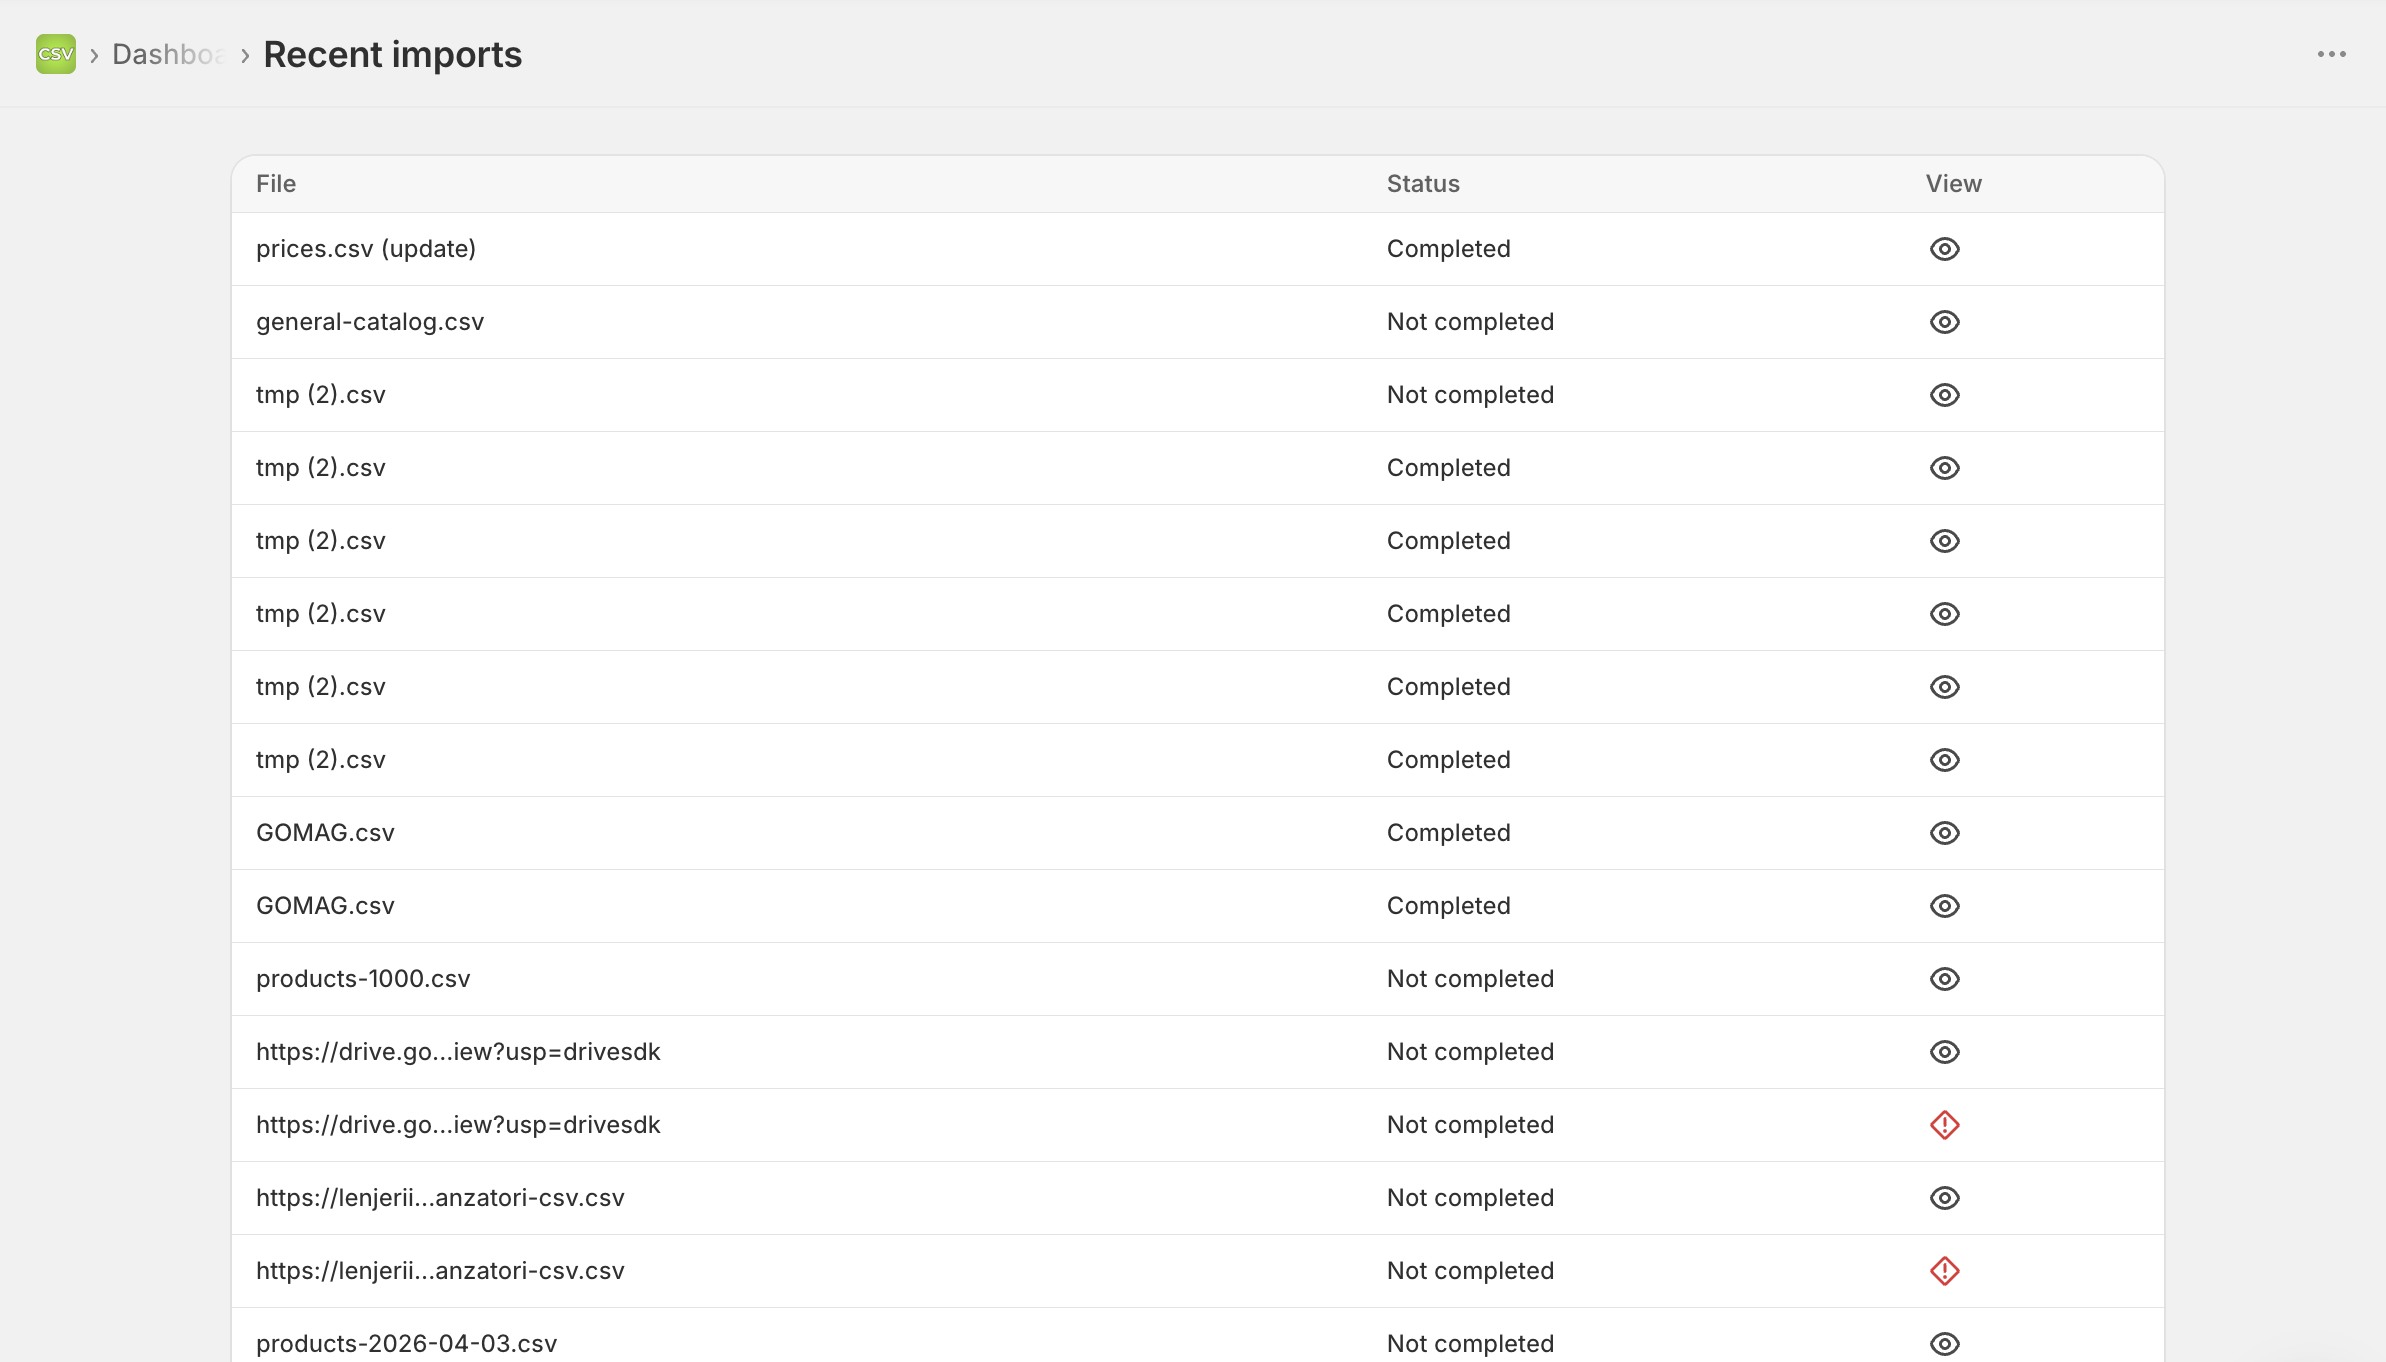
Open any run for the row-level detail.
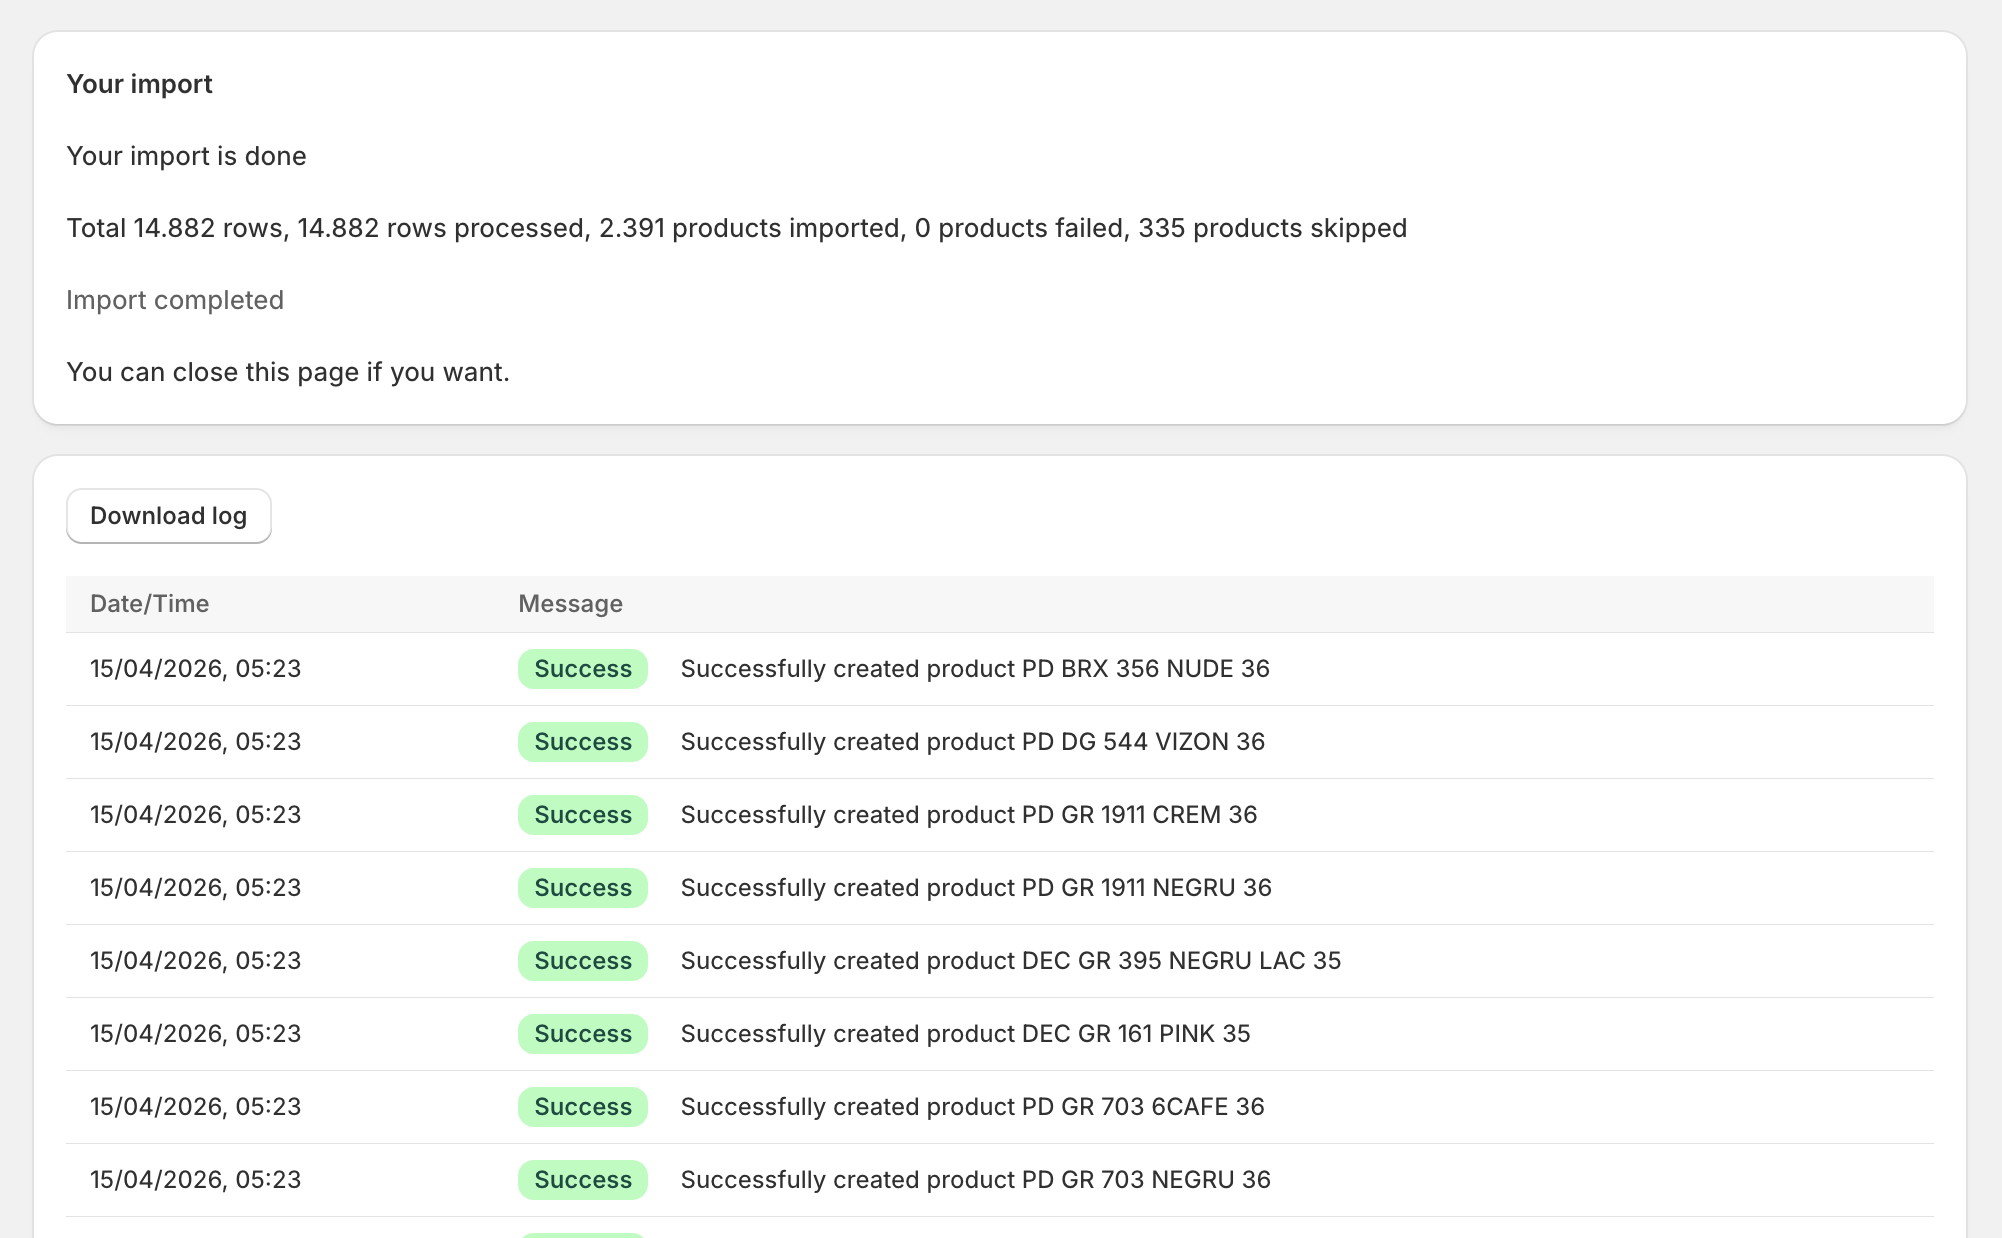
The summary at the top shows the number of rows processed, variants updated, failures and skipped variants. Below that, every row gets a Success, Warning or Error status with an explanation.
When an exact SKU or barcode belongs to several products, the log names the identifier, reports how many products matched and confirms that the row was skipped to avoid updating the wrong product.
For audit, the log can be downloaded as a file - useful when a customer queries a price change two months later and you need to confirm exactly what synced when.
Notifications are in-app - there's no email yet when a run fails. Until that changes, the recommended habit is to check the Recent imports list once a week, especially in the first month after setup.
Real-World Scenarios
Three common supplier sync setups and how to configure each.
Daily inventory sync from a wholesale supplier
You sell ~3,000 SKUs from a wholesaler. They publish a daily stock feed at 2 AM. You want stock levels in your store to reflect their warehouse before your customers wake up.
- Strategy: Update existing only
- Match: SKU
- Mapped fields: SKU + inventory quantity and nothing else
- Pro or Scale schedule: Every day at 4 AM local time
Minimal mapping matters when you have already edited titles, descriptions and images in Shopify. The supplier's feed may contain all of them, but the daily run should not overwrite your work. Map only the SKU and stock fields for a predictable daily update.
Weekly price update from a brand
You sell a brand's products at retail. They update wholesale prices weekly, on Sundays. You want your retail prices and compare-at prices to reflect the new wholesale costs every Monday morning.
- Strategy: Update existing only
- Match: SKU
- Mapped fields: SKU, price and compare-at price
- Pro or Scale schedule: Every Monday at 6 AM
The compare-at price column handles sale rotations. When the brand puts a product on sale, the feed populates compare-at. When the sale ends, compare-at goes blank and your "was/now" UI clears automatically.
New product additions from a dropship supplier
A dropship supplier adds new products throughout the week. You want them in your store within 24 hours with images descriptions and starting prices. You also want to review them quickly before they go live to customers.
- Strategy: Create new products
- Overwrite behavior: Skip products with the same SKU (so the daily run only creates products that don't already exist)
- Mapped fields: SKU, title, description, images, price, inventory quantity and vendor
- Pro or Scale schedule: Every day at 3 AM
- Set new products to Draft status then promote to Active after a quick review
Create runs use an Overwrite behavior setting rather than a match key. You can import all rows, skip products with the same EAN or skip products with the same SKU. For a daily dropship feed, Skip-by-SKU is the safe choice. It stops the run from creating a duplicate each time the supplier includes a SKU added on an earlier day.
Pair this Pro or Scale create schedule with a separate update schedule for the same supplier. One creates new products. The other refreshes prices and stock on existing products, which makes a failed run easier to trace.
Advanced Pricing and Inventory Rules (Pro and Scale plans)
The Pro and Scale plans can adjust supplier stock and prices without editing the source feed. The rules below run again on every scheduled import.
Advanced inventory rules
Inventory rules can rewrite SKUs, apply a low-stock buffer and turn a supplier status into zero stock.
Add a prefix or suffix to the SKU. When the supplier's SKUs collide with your existing SKUs or when you want to namespace a supplier's products you can prefix or suffix every incoming SKU. A SKU of H4H499.2 becomes SUP-H4H499.2 with a SUP- prefix or H4H499.2-EU with an -EU suffix. The mapping screen shows a live preview of the resulting SKU as you type.
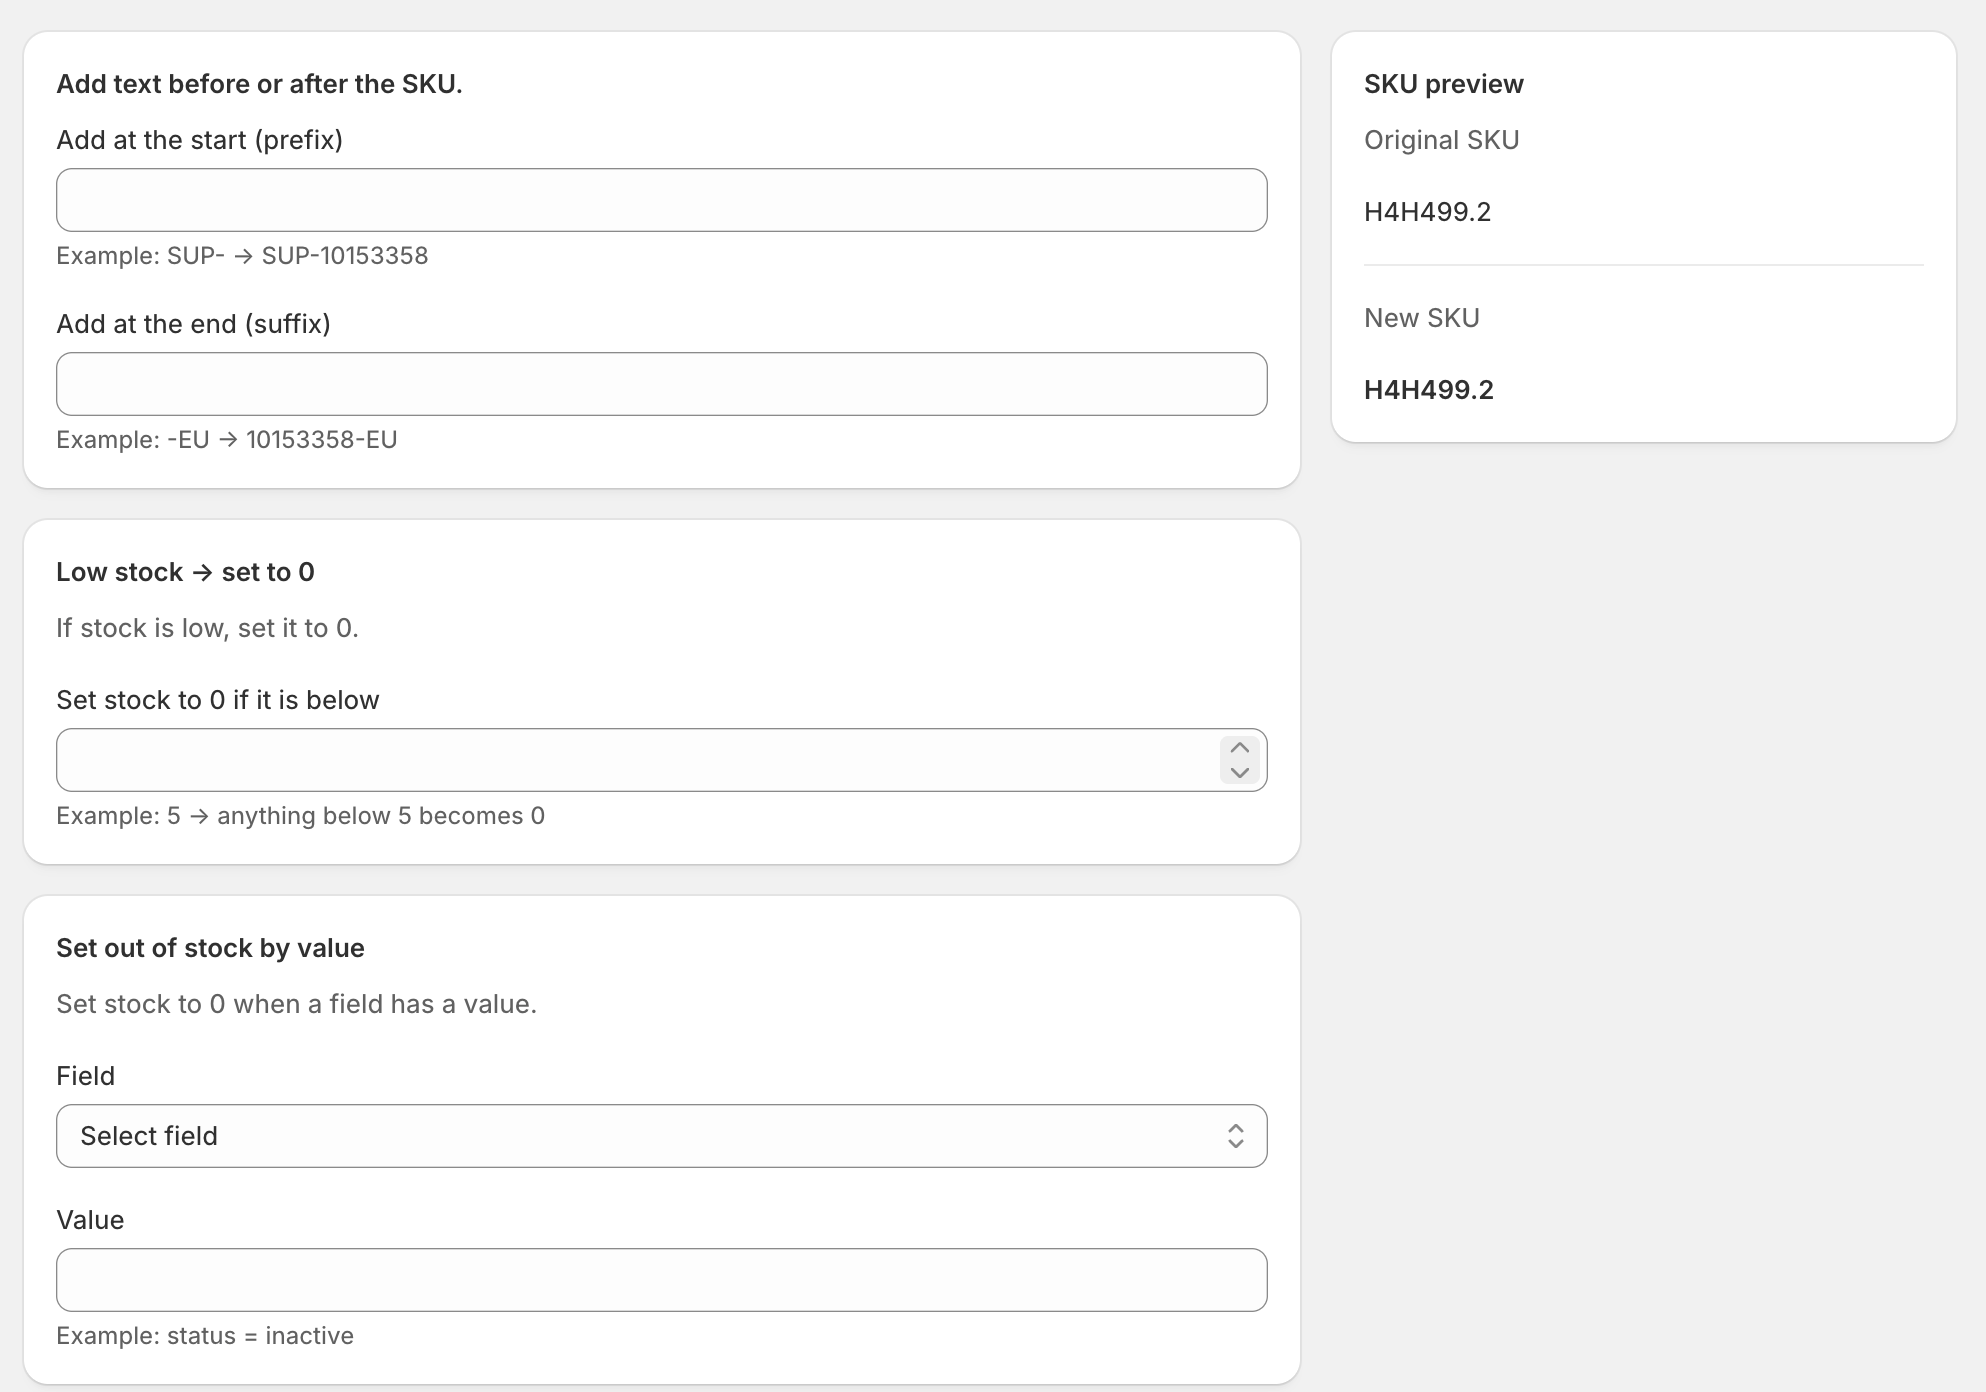
Low stock -> set to 0. A safety threshold for selling sold-out products. If you set the threshold to 5 anything below 5 is treated as zero stock for the import. This protects against the standard "supplier shows 2 in stock but they shipped to another retailer first" problem - by the time you process the order they're sold out and you have an angry customer. Setting the threshold a little above zero leaves a buffer.
Set out of stock by value. Some suppliers don't track stock as a number - they use a status field like available / inactive / discontinued. This rule lets you pick a field and a value that means "out of stock". When the rule matches the row's stock is set to zero regardless of what the stock column says.
Advanced pricing rules
Pricing rules apply fixed changes or percentage markups, then round the result.
Fixed change. Add or subtract a fixed amount from every price. Useful for shipping cost markups or fixed-amount commission. Use a minus sign to subtract - -3 turns a price of 10 into 7.
Percentage change. Add or subtract a percentage. 25% turns 10 into 12.50. -20% turns 10 into 8. Percentage change is applied after the fixed change, so you can add EUR 2 for packaging and then apply a 30% margin.
Price rounding. Round to the nearest whole number, half or another increment. You can also choose a .99 or .95 ending. A supplier price of 19 with a 25% markup and .99 ending becomes 23.99 instead of 23.75.
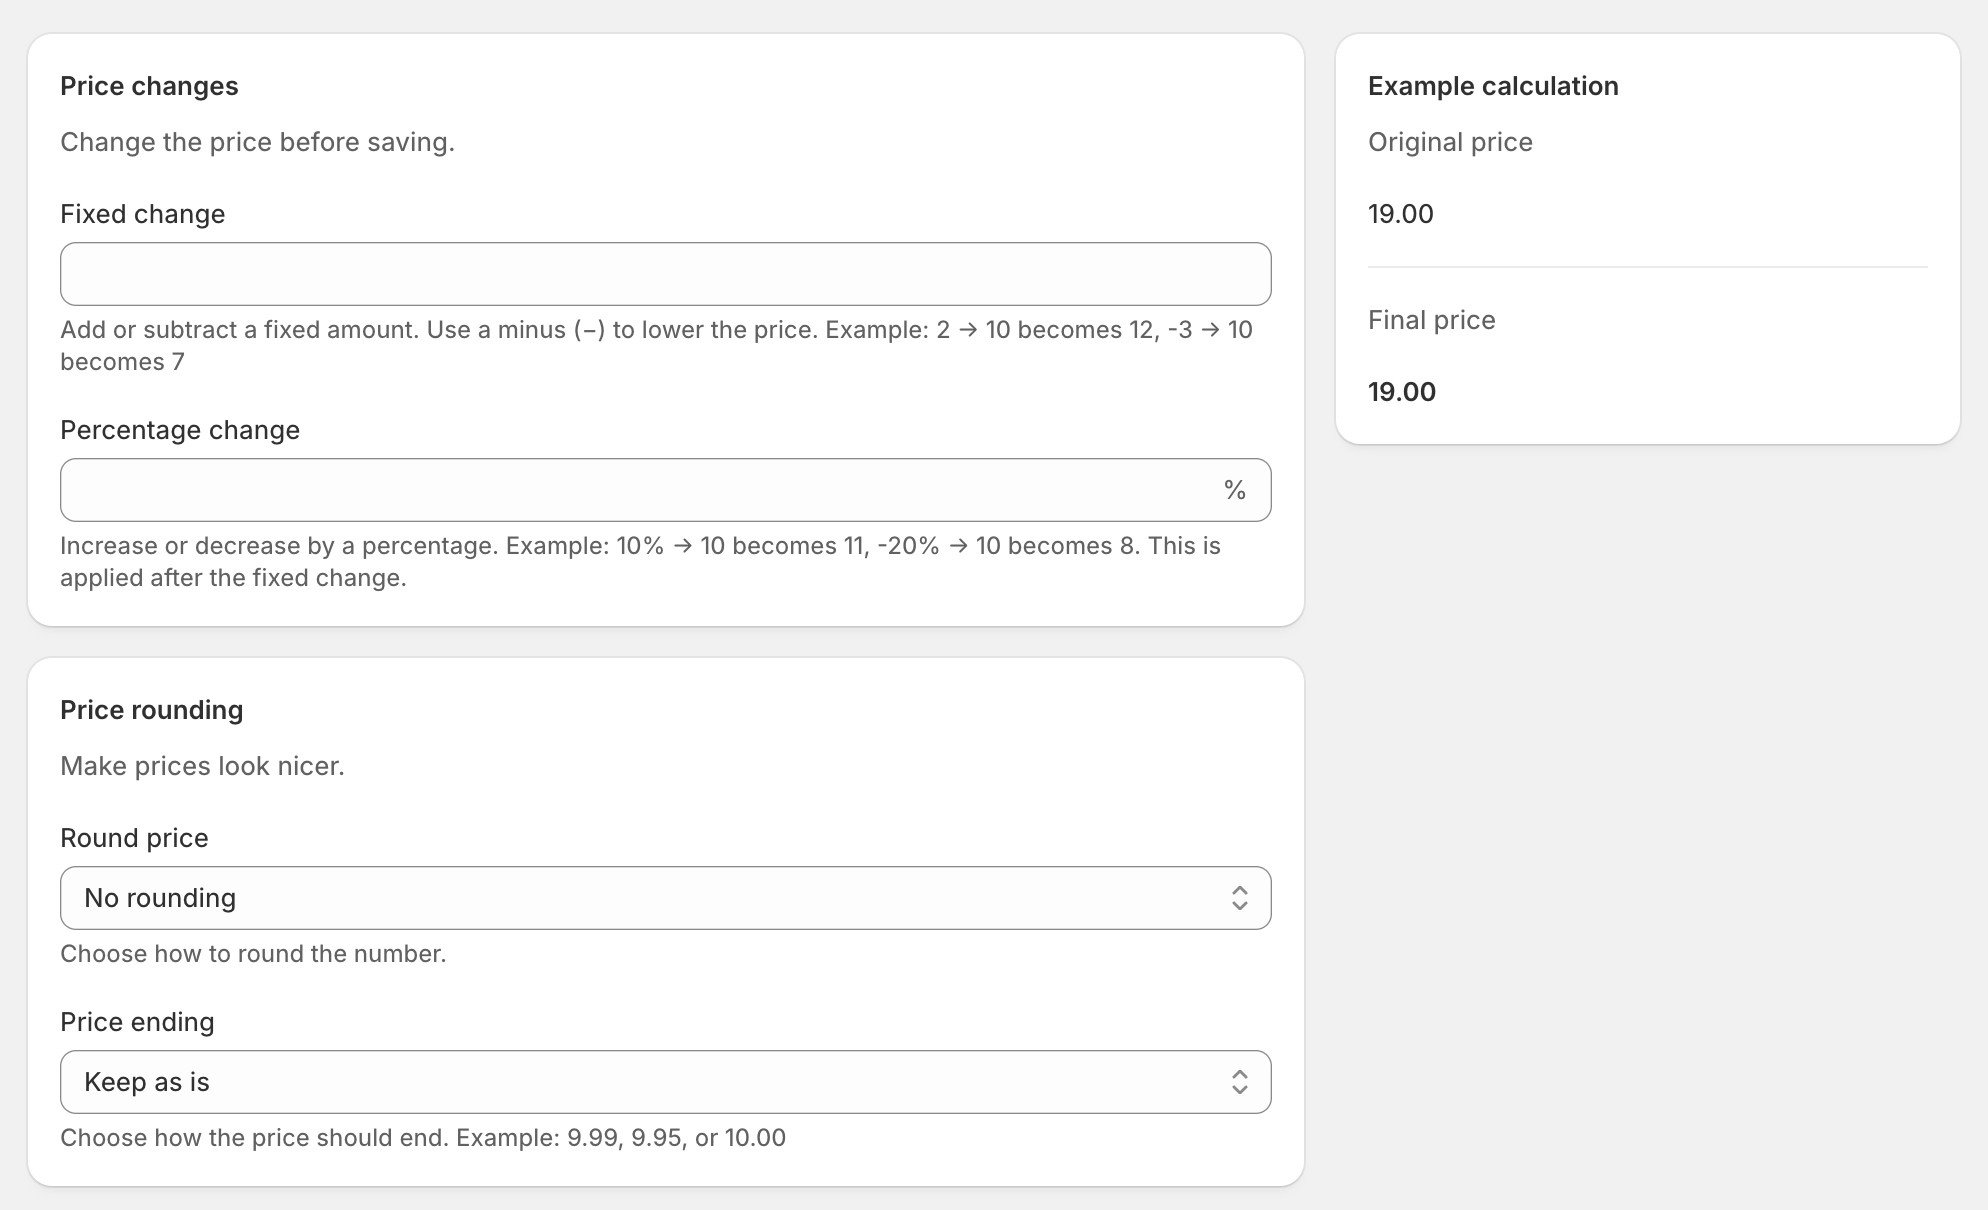
A percentage markup combined with rounding to .95 keeps the same margin when a supplier raises wholesale prices. The retail prices update overnight and still end in .95.
Why these rules matter for sync
Without these rules, every supplier feed needs preprocessing before or after import. Simple CSV applies the saved rules on every scheduled run on Pro and Scale. The markup stays in the app rather than in a copy of the supplier's feed.
Advanced rules and scheduled URL imports are part of the Pro and Scale plans. The Free plan still supports manual URL imports and column mapping. Automated supplier sync requires a paid plan.
Known Limitations
Variants missing from the feed. Free and Pro do not clean up missing feed items automatically. On those plans, use a manual diff between your Shopify catalog and the latest supplier feed to find discontinued products. On Scale, optional cleanup checks every previously managed variant. A variant missing from the current feed is set to 0 at every active Shopify location, even when sibling variants are still present. Simple CSV then turns off Continue selling when out of stock for the missing variant. It does not turn that setting back on if the variant reappears, although the next import restores the feed quantity.
Inventory is set to 0 before Simple CSV applies the configured product action. A product stays active when only some variants are missing. When every tracked variant is missing, cleanup leaves the product active, sets it to draft or unlists it according to your setting. Simple CSV does not delete it.
Cleanup uses the saved Shopify variant ID when one is available. For older tracked rows, it falls back to the mapped Shopify variant SKU or barcode.
Authentication beyond basic auth. Basic auth in the URL works at https://user:pass@example.com/feed.csv. API key headers, OAuth tokens and signed URLs with expiring parameters do not. The standard workaround is a small middleware script. It authenticates to the supplier's API, downloads the CSV and serves it from your own HTTPS endpoint with basic auth. A free Cloudflare Worker can do this in under fifty lines.
FTP and SFTP feeds. Not supported. Ask whether the supplier also offers HTTPS. If FTP is the only option, use a scheduled job to copy the file to a public HTTPS path each morning.
XML and JSON feeds. Not Simple CSV's job. For non-CSV feeds, Inventory & Price Sync handles XML and JSON.
Sub-hourly sync. A Pro or Scale schedule runs once at its chosen time. Multiple schedules per day are possible within the plan limits, but a real-time or sub-hourly sync from a single feed is not. Most supplier feeds update once or twice a day, so a daily or twice-daily import fits them. Flash sales and high-velocity inventory that need sub-hourly parity require another tool.
Email failure notifications. Notifications are in-app only at the moment. Until email alerts ship, check the Recent imports list weekly.
Best Practices
Use these checks when setting up a Pro or Scale production schedule.
- Test with one row first. Before enabling a Pro or Scale schedule, manually run a one-row CSV to confirm the mapping and matching are correct. A row-level success on a single product is much cheaper than discovering a mapping bug across 3,000 products.
- Back up before the first large sync. A free backup app gives you a recovery path if a feed change causes the wrong updates.
- Match by SKU. It is predictable and the right default for almost every supplier feed.
- Schedule outside peak shop hours. Pro and Scale imports use API calls. Large imports can compete with other store activity if scheduled during a busy period.
- Check logs weekly, especially in the first month. Most issues surface in the first few weeks, including column renames, format changes and expired authentication. After a month of clean runs, monthly checks are usually enough.
- One schedule per concern. Within the Pro or Scale automation limit, a daily price refresh, a daily stock refresh and a daily new-product create are easier to debug as three schedules than one.
- Save your mapping configs. Re-importing from the same source reuses the saved mapping. You do not need to map columns again each time.