Guide
How to Import Products into Shopify with a CSV File
Last updated: 19 September 2026
Shopify can create products from a CSV uploaded at Products → Import. One file can contain a few products or thousands of variants.
A CSV is a plain-text file that spreadsheet apps display as rows and columns. Each row represents a product or variant. Columns hold fields such as title, price, SKU and inventory level.
Merchants typically use CSV imports for jobs like these:
- Move products from another platform like WooCommerce, BigCommerce or Magento
- Add a supplier's product list to their store
- Update prices, stock or barcodes in bulk
- Restructure their catalog after a vendor change
- Onboard a new store with thousands of SKUs
This guide covers the full workflow:
- How Shopify's built-in CSV importer works, step by step
- The exact CSV format Shopify expects, column by column
- How variants, images, inventory and metafields work in the CSV
- The most common reasons CSV imports fail and how to fix each one
- When the native importer is enough and when you need an app
Two Ways to Import a CSV into Shopify
There are two ways to get products into Shopify from a CSV.
1. Shopify's built-in CSV importer. Free, included in every Shopify plan, available at Products -> Import in your admin. Works well when your file already follows Shopify's exact format.
2. A CSV import app. Apps like Simple CSV Import let you import almost any CSV file by mapping its columns to Shopify fields. Useful when your file came from a supplier, an old store or anywhere that doesn't follow Shopify's structure.
The native importer comes first, including the exact format it expects and the most common things that go wrong. If your CSV still won't import, the second half of the guide explains the alternative.
How Shopify's Native CSV Importer Works
You can find Shopify's CSV importer in your admin under Products -> Import.
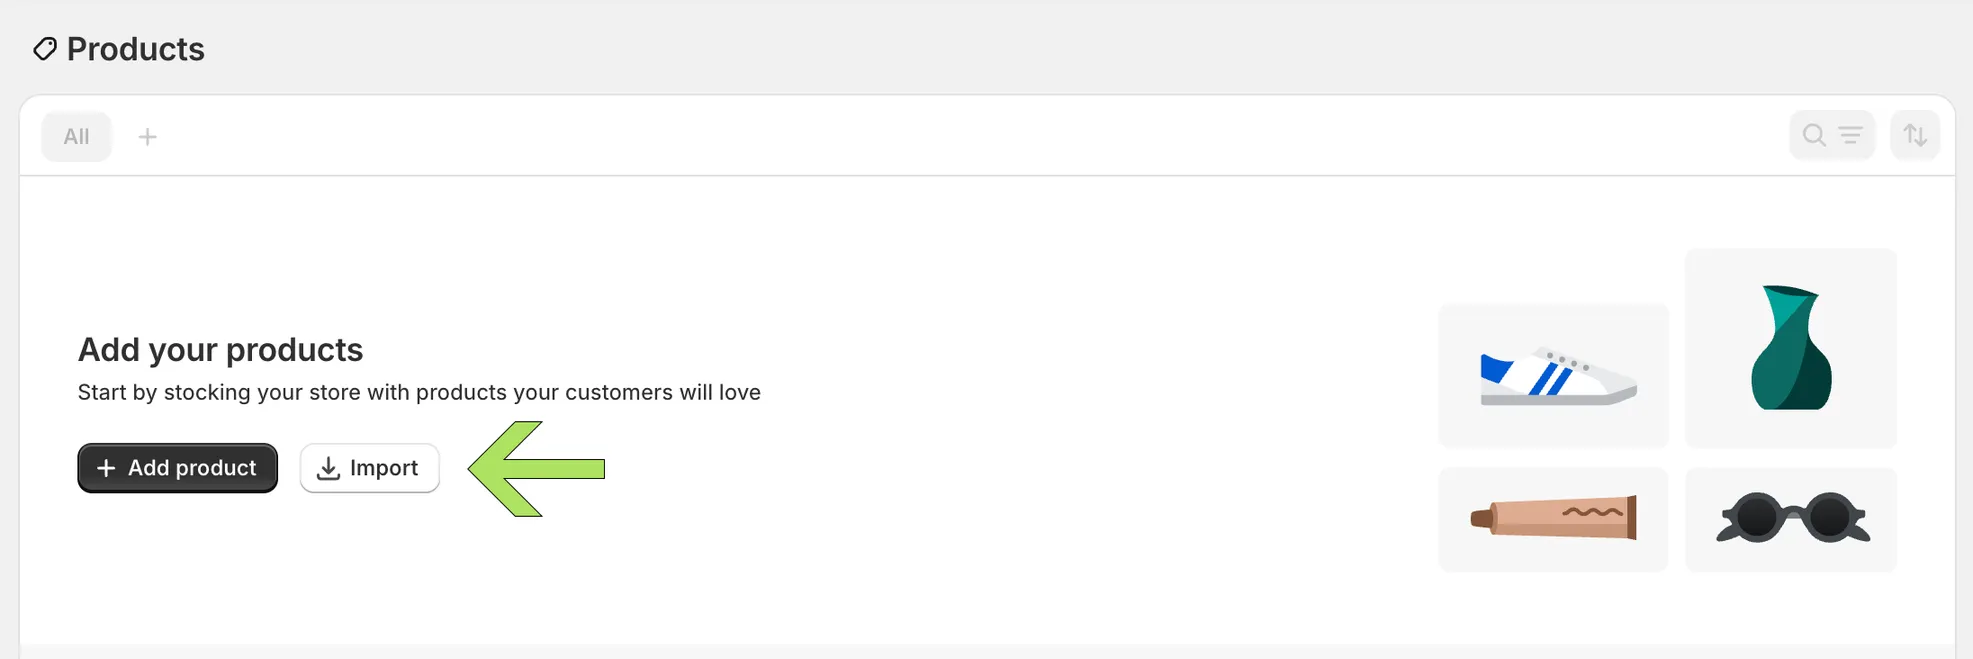
Click Import, upload a CSV file in Shopify's exact format and Shopify will create or update products based on the file's contents.
It is free and built into Shopify. For the right file it works fine, but it has limits worth knowing before you commit.
- No column mapping. Your CSV must use Shopify's exact column names.
product_namewon't be recognized as a title. It has to beTitle. - No remote URLs. You can only upload a file from your computer. You can't point Shopify at a supplier's URL or an FTP feed.
- No scheduling. Every import is manual. There's no way to run a daily or hourly sync.
- No preview. You upload, Shopify processes and then you see what happened.
- Strict format requirements. A missing handle, stray quote or unescaped comma can cause rows to fail.
- File size and row limits. Large catalogs may need to be split into multiple files.
For a clean, Shopify-formatted file under a few thousand rows, the native importer is the simplest tool for the job. For anything else, an app will save you hours.
Shopify Product CSV Columns
Shopify's product CSV has more than 50 possible columns. You don't need every one - most imports use 10 to 15 - but you do need to use Shopify's exact names. Here's what each group of columns does.
Download the official Shopify product CSV template to see the current columns.
Identity columns
These describe what the product is.
- Handle - A unique identifier used in the product's URL (e.g.,
red-cotton-shirt). Required. All variants of the same product must share the same Handle. - Title - The product name shown to shoppers.
- Body (HTML) - The product description. Supports HTML.
- Vendor - The brand or manufacturer.
- Product Category - Shopify's standard product taxonomy.
- Type - A custom product type used for organization.
- Tags - Comma-separated tags. Useful for filtering and collections.
- Published -
TRUEorFALSE. Controls whether the product is visible on your storefront. - Status -
active,draftorarchived. Imports default toactiveunless you specify otherwise.
Variant columns
Variants are different versions of the same product, such as sizes or colors.
- Option1 Name / Option1 Value - e.g.,
Size/Medium - Option2 Name / Option2 Value - e.g.,
Color/Blue - Option3 Name / Option3 Value - Up to three options per product
- Variant SKU - Unique stock keeping unit
- Variant Grams - Weight in grams (always grams, regardless of unit)
- Variant Inventory Tracker -
shopify, a third-party fulfillment service name or blank - Variant Inventory Qty - Stock level
- Variant Inventory Policy -
deny(don't allow oversell) orcontinue(allow oversell) - Variant Fulfillment Service -
manualfor self-fulfillment or a service name - Variant Price - Selling price
- Variant Compare At Price - "Was" price for showing discounts
- Variant Requires Shipping -
TRUEorFALSE - Variant Taxable -
TRUEorFALSE - Variant Barcode - UPC, EAN, ISBN or other barcode
- Variant Weight Unit -
g,kg,ozorlb - Variant Tax Code - Used with Avalara
- Cost per item - Your cost (used for margin reporting, not shown to customers)
Image columns
- Image Src - Public URL of the product image
- Image Position -
1,2,3... controls the order images appear - Image Alt Text - Accessibility and SEO text
- Variant Image - A specific image to display when this variant is selected
SEO columns
- SEO Title - Title used in search engines
- SEO Description - Meta description for search engines
Other columns
- Gift Card -
TRUEif the product is a gift card - Google Shopping / * - A series of fields for Google Shopping feeds
- Variant Country/Region of Origin - ISO country code
- Included / [country] -
TRUEorFALSEper market - Price / [country] - Market-specific price
- Compare At Price / [country] - Market-specific compare-at price
Metafield columns
- Metafield: namespace.key [type] - Any custom data field. The metafield section below explains the format.
Check these columns carefully. Merchants most often get Variant Inventory Tracker wrong because it must be
shopifyto track stock. Status should beactiveif products need to be visible immediately. Image Position controls image order, while the market-specific Price columns are only needed when you sell in multiple markets.
How Variants Work in the CSV
Variant rows use a shared Handle to stay attached to the same product.
Shopify treats every variant as its own row in the CSV. Variants of the same product are tied together by sharing the same Handle. Only the first row of a product needs the full product data (Title, Body, Vendor, Tags, etc.). Subsequent variant rows can leave those columns blank - Shopify uses the Handle to know they belong to the same product.
This T-shirt has three sizes and two colors, giving it six variants.
Handle,Title,Option1 Name,Option1 Value,Option2 Name,Option2 Value,Variant SKU,Variant Price
classic-tee,Classic Tee,Size,Small,Color,Blue,TEE-S-BLU,29.99
classic-tee,,Size,Medium,Color,Blue,TEE-M-BLU,29.99
classic-tee,,Size,Large,Color,Blue,TEE-L-BLU,29.99
classic-tee,,Size,Small,Color,Red,TEE-S-RED,29.99
classic-tee,,Size,Medium,Color,Red,TEE-M-RED,29.99
classic-tee,,Size,Large,Color,Red,TEE-L-RED,29.99
Notice that only the first row has the title. The rest are variant rows.
Keep these two rules in mind.
- All variants of one product share one Handle. Lose the handle and Shopify creates duplicate products instead of variants.
- Variant order matters for the default selection. The first row is the default variant shown to shoppers.
If you want a specific image to appear when a shopper selects a variant, fill in the Variant Image column with that image's URL. For example, use the red shirt photo URL for the Red variant.
How Images Work in the CSV
Images are the second-biggest source of import failures. Check the URL, row structure, format and file size.
Image Src must be a public URL. Shopify needs to fetch the image from your URL. If the image sits behind authentication, hotlink protection or a private CDN, Shopify can't download it. Test a URL by opening it in a private browser window. If it loads there, Shopify can fetch it.
Multiple images use multiple rows. A product with three images uses three rows. The first contains all product data and the first image URL. The next two repeat the Handle, leave product data blank and contain only the image columns.
Handle,Title,Image Src,Image Position
red-shirt,Red Shirt,https://example.com/shirt-1.jpg,1
red-shirt,,https://example.com/shirt-2.jpg,2
red-shirt,,https://example.com/shirt-3.jpg,3
Format and size matter. Shopify accepts JPG, PNG, GIF and WebP. It does not support .avif or .bmp. Files larger than 20 MB or with unusual color profiles can also fail. Convert AVIF or BMP images to WebP or JPG before importing.
These image URL problems also appear in real imports.
- Shopify's image fetcher can be aggressive and time out on slow servers
- URLs that redirect (e.g.,
http://->https://) sometimes fail mid-fetch - Expired or signed CDN URLs (those with
?expires=...parameters) often stop working before the import finishes - Hotlink protection on the source server will block Shopify entirely
If you're seeing images fail in bulk, the source URLs are almost always the problem.
Inventory and Locations
Shopify supports multi-location inventory, so the same SKU can have stock at several warehouses or retail stores. The native product CSV importer only sets inventory at the default location.
A standard product CSV can only set inventory for your store's default location. For multiple locations, choose one of these options.
- Import the products via CSV with inventory at the default location, then move stock with Shopify's bulk editor
- Use Shopify's separate inventory CSV export/import (Inventory -> Export, edit, Import)
- Use a CSV import app that supports multi-location inventory in a single file
Two columns set inventory at the default location. Use Variant Inventory Tracker with shopify to track stock, then put the quantity in Variant Inventory Qty.
If Variant Inventory Tracker is blank, Shopify won't track inventory for that variant and the quantity will be ignored. This often causes the "I imported my products but inventory is zero" problem.
Metafields in the CSV
You can import metafields directly through the product CSV. Use the following column header format.
Metafield: namespace.key [type]For example:
Metafield: custom.material [single_line_text_field]- a fabric or material nameMetafield: custom.warranty_years [number_integer]- a warranty durationMetafield: my_fields.care_instructions [multi_line_text_field]- a care guide
Type values match Shopify's metafield types, including single_line_text_field, multi_line_text_field, number_integer, number_decimal, boolean, date and url. The metafield definition must already exist in your store before the import. Shopify won't create new definitions automatically.
Importing with the Native Importer
The native import workflow has six steps.
Before you start
- File is saved as
.csvwith UTF-8 encoding - All required columns are present (Handle, Title at minimum)
- All Image Src URLs are publicly accessible
- Variants share Handles correctly
- Test on a small file first (5-10 rows)
- Back up your store data because Shopify has no one-click undo for a product CSV import
Step 1 - Download the template
Get Shopify's official template. Even if you have your own CSV, opening the template helps you see the exact column names Shopify expects.
Step 2 - Add or paste your data
Open the template in Excel, Google Sheets, LibreOffice or Numbers. Add your products. Each row is a product or a variant.
Step 3 - Save as CSV with UTF-8 encoding
Export or save as a CSV file. Use UTF-8 encoding. Without it, accents, dashes and currency symbols can become question marks in your store. The next section covers the setting in common spreadsheet tools.
Step 4 - Upload to Shopify
In your Shopify admin:
- Go to Products
- Click Import
- Choose your CSV file
- Optionally select Overwrite any current products that have the same handle (use carefully)
- Click Upload and continue, then Start import
Step 5 - Wait for the confirmation email
Shopify processes the import in the background. You'll get an email when it's done. Small files usually finish within a few minutes, while large files take longer.
Step 6 - Verify and check for errors
Open Products in your admin. The email also flags any rows that failed. Click through to a few products and confirm titles, variants, prices and images all look right. If something's off, check the troubleshooting section below before re-importing.
Excel and Google Sheets Pitfalls
Excel and Google Sheets can silently change identifiers, encoding and delimiters in a CSV.
Scientific notation on barcodes. A 13-digit barcode like 1234567890123 becomes 1.23457E+12 and Shopify gets a useless number. Format the barcode column as Text before pasting. In Excel, select the column and choose Format Cells, then Text. In Google Sheets, choose Format, Number and Plain text.
Leading zeros stripped from SKUs. A SKU like 00123 becomes 123. Format the column as Text first.
Date auto-formatting. A SKU like 1-2-3 becomes a date. Same fix.
Long URLs broken into formulas. If a URL starts with =, Excel treats it as a formula. Rare, but it happens.
UTF-8 vs Windows-1252 encoding. Excel on Windows can use Windows-1252, which mangles non-English characters. Choose "CSV UTF-8" when saving. It is a separate option in current Excel versions. Google Sheets exports UTF-8 by default.
Comma vs semicolon delimiter. In many European locales, Excel saves CSV files with semicolons (;) instead of commas. Shopify expects commas. Change your Excel list separator temporarily or use Google Sheets, which exports with commas.
BOM markers. Some Excel exports add a hidden Byte Order Mark to the start of the file. Shopify usually handles it, but other tools may not.
Line breaks inside Body (HTML). Long descriptions with embedded line breaks need to be wrapped in double quotes, with internal quotes escaped as "". Easier to write descriptions as a single line of HTML or paste from a tool that handles escaping.
If your import produces odd characters, scientific notation or missing rows, inspect the spreadsheet export settings before changing data in Shopify.
If you want to keep the source online instead of exporting a new file after every edit, follow the guide to importing and updating Shopify products from Google Sheets.
Troubleshooting Common Shopify CSV Import Errors
Most CSV import failures fall into a small set of patterns. Here's what each one means and how to fix it.
For a shorter checklist, see the Shopify CSV import error support article.
"The file you uploaded is too large"
Shopify limits CSV imports by file size. Split the file into smaller chunks (most merchants use 5,000 rows per file as a safe limit) and import them one at a time.
"Invalid CSV header" / missing required columns
Your column names don't match what Shopify expects. Common mistakes include lowercase handle instead of Handle, Variant Sku instead of Variant SKU and Image URL instead of Image Src. Open Shopify's template and copy the headers exactly.
"Image source is required" / "Could not be downloaded"
The Image Src URL isn't accessible to Shopify. Check that the URL loads in a private browser window. If it does and Shopify still can't fetch it, the source is likely blocking Shopify's user agent or rate-limiting requests.
Images time out during import
Shopify's image fetcher gives up after a few seconds per image. If your images are hosted on a slow server, many will fail. Move the images to a fast public host first (Cloudinary, Imgur, Dropbox public links) or use an app that downloads the images on its own server first and re-uploads them to Shopify.
"Duplicate handle" errors
Two different products share the same Handle. Check your file - if you intended them to be variants, the variant rows should have blank product fields and the same Handle. If they're separate products, give each a unique Handle.
Variants didn't import - they merged into one product
The Handle column is identical across rows that should be different products. Add unique Handles to each.
Products imported but show 0 inventory
The most common cause is a blank Variant Inventory Tracker instead of shopify. Without that value, Shopify ignores the inventory quantity. Re-export with the column set to shopify for trackable items.
Products imported but show as Draft (not visible on storefront)
The Status column is set to draft or the Published column is FALSE. Set Status to active and Published to TRUE if you want products live immediately.
Special characters became question marks
Encoding issue. Save the CSV as UTF-8 (specifically "CSV UTF-8" in Excel) and re-import.
A comma in a product title broke the row
A comma inside a field - e.g., Title: Shoes, Black, Size 10 - splits the row into multiple cells. Wrap any field containing a comma in double quotes: "Shoes, Black, Size 10". Most spreadsheet tools do this automatically when saving as CSV.
Import "succeeded" but some products are missing
Open the email Shopify sent because it usually flags skipped rows. Common reasons include invalid handles, blank required fields, image fetch failures and duplicate SKUs that collide with existing products. Fix those rows and re-import only the missing ones.
When the Native Importer Isn't Enough
The native importer is a good tool, but these situations push merchants past what it can do.
- Your CSV came from a supplier, not Shopify. Renaming and re-ordering 30 columns by hand for every weekly update is not a sustainable workflow.
- You need column mapping. A CSV with columns named
name,costandqtywon't be recognized - it has to beTitle,Variant PriceandVariant Inventory Qty. - You need to import from a URL. Suppliers often provide a feed at a URL that updates automatically. The native importer can only handle a file from your computer.
- You need scheduled imports. Daily price updates, hourly inventory syncs - none of this is possible natively.
- You need to update existing products by SKU or barcode. The native importer can update products with matching Handles, but it cannot use those identifiers.
- Your file is too big. Splitting and re-uploading a 50,000-row file every time is a chore.
- You want a preview. A preview lets you correct the mapping before the import changes products.
If these limits affect your file, compare the options in the Shopify CSV Importer vs Simple CSV comparison. A separate guide to bulk updating Shopify products with CSV is also planned.
Importing with Simple CSV
Simple CSV Import accepts CSV, XLS and XLSX files from your computer or a URL, then maps non-Shopify headers. Excel imports read the first worksheet only. It shows five example rows before import. The Free plan handles up to 100 rows per file.
If you already have a file ready, the Simple CSV import strategy guide explains how to choose between creating products, updating them and grouping variant rows.
Here's how a typical import works.
Step 1 - Upload your file
Upload a file from your computer or paste a URL pointing to a supplier feed. URL imports are useful for any source that updates regularly.
Step 2 - Choose what you want to do
Pick whether the import should create new products, update existing ones or both. For updates, choose SKU, barcode or product handle as the match field. SKU is the most reliable for supplier feeds.
Simple CSV compares SKU, barcode and handle values exactly after ignoring letter case and surrounding spaces. Prefix matches are not accepted. If the same exact SKU or barcode belongs to several products, the row is skipped and the log reports how many products matched.
Step 3 - Map your columns
Simple CSV reads your file's actual headers and lets you map each one to a Shopify field. Many fields are matched automatically - price to Variant Price, stock to Inventory Qty, name to Title - and you can adjust any mapping by hand.
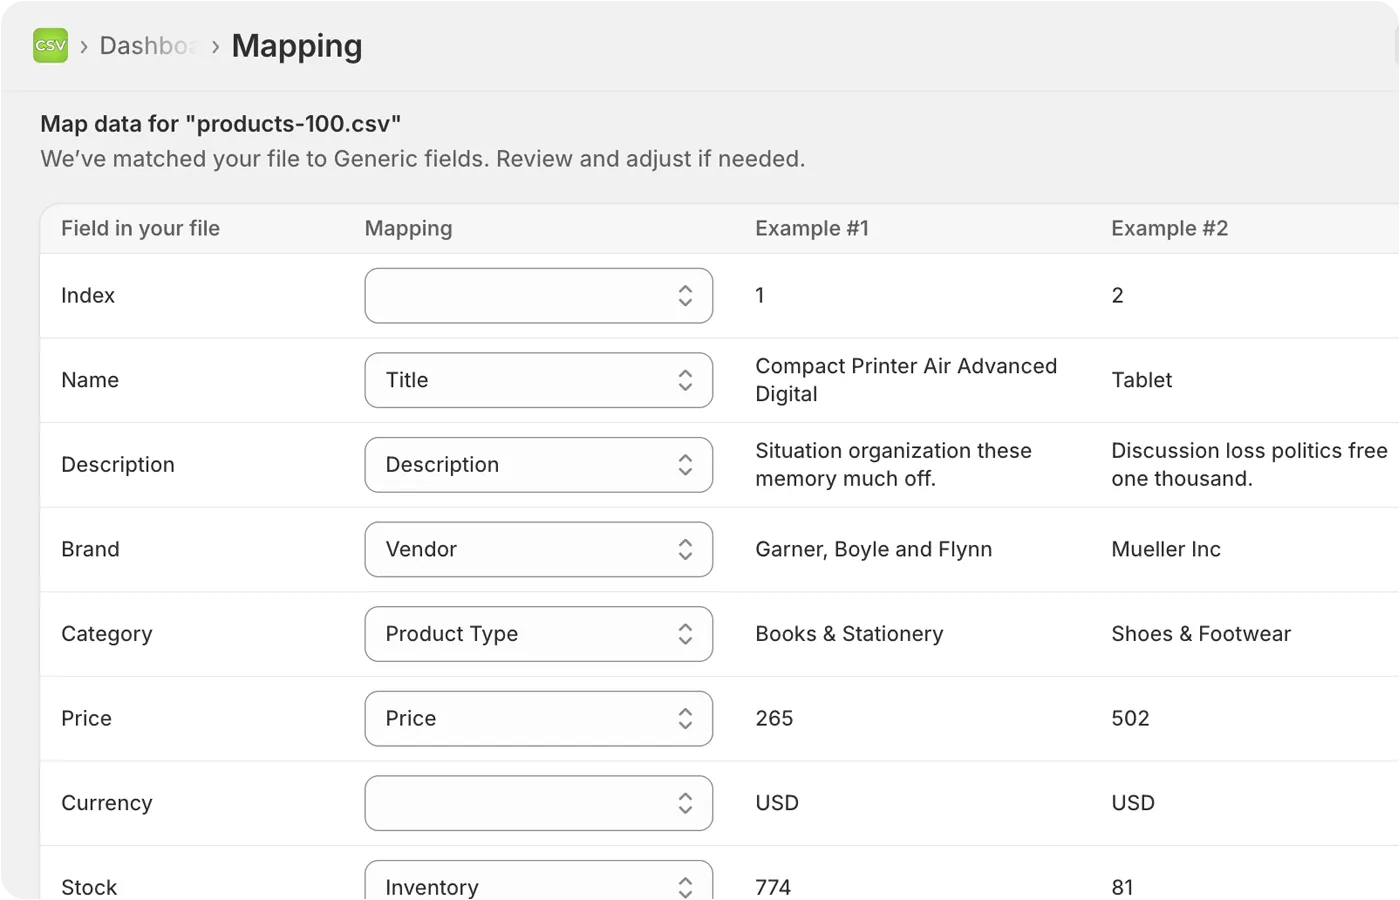
Step 4 - Preview the import
Before anything is changed in your store, you can preview how the products will look. This catches problems before they hit your live catalog.
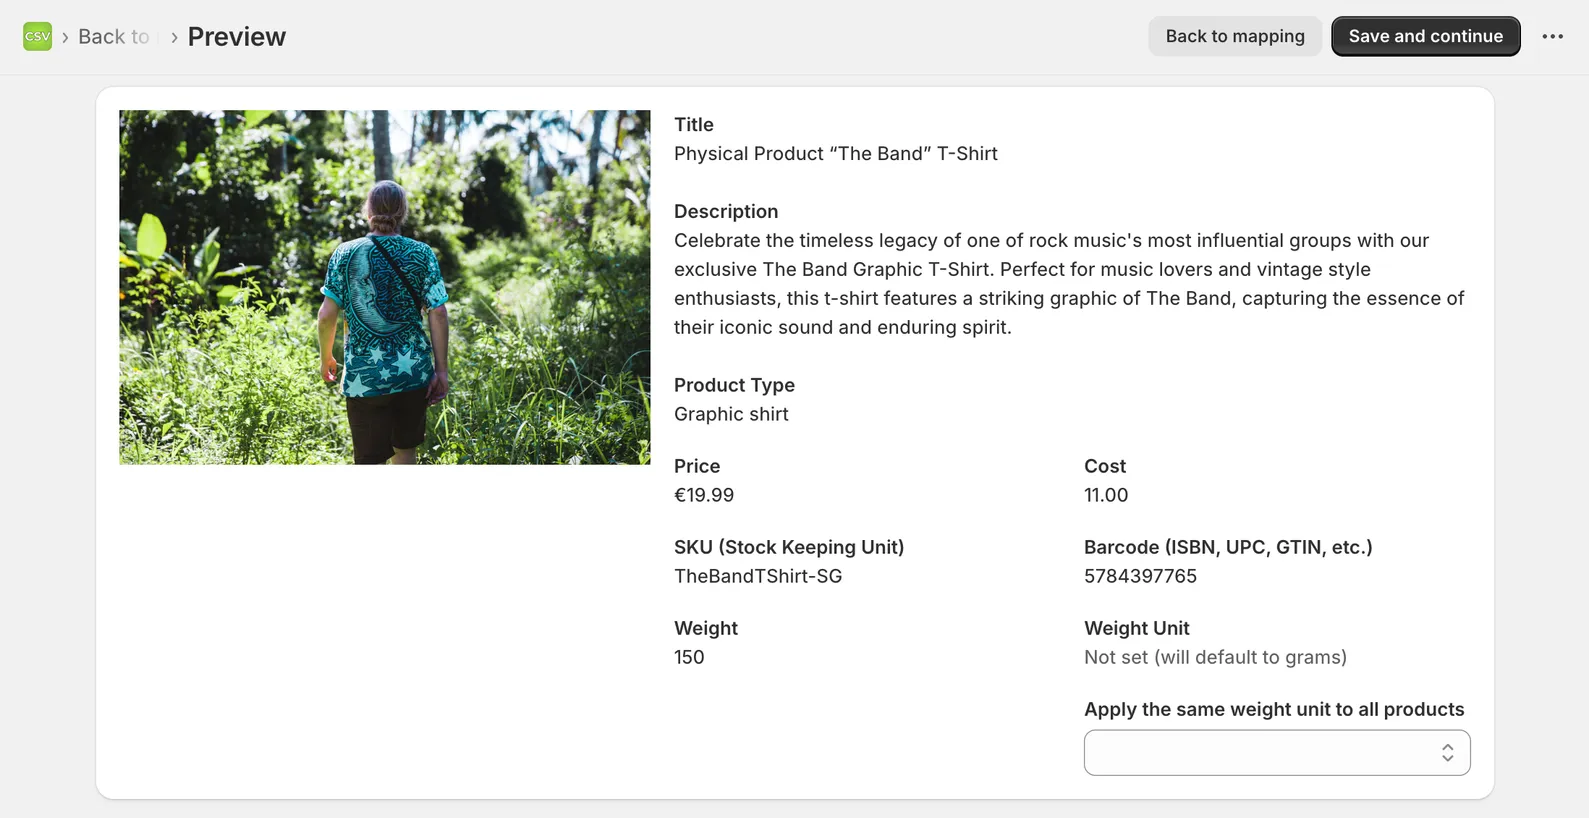
Step 5 - Run the import
Start the import and watch progress on the status page. You'll see how many products were created or updated, along with skipped rows and failure reasons.
For supplier feeds and recurring updates, Pro and Scale can run the same setup on a schedule, so you can leave it alone and your store stays in sync.
Best Practices for CSV Imports
These habits make repeat imports easier to check.
- Always test with a small file first. 5-10 rows is plenty. Confirm everything imported correctly before running the full file.
- Back up your store before any large import. A free backup app gives you a rollback point if the mapping changes the wrong fields.
- Match by SKU when updating, by Handle when creating. SKUs are stable across imports. Handles are tied to URLs and shouldn't change.
- Run imports outside peak hours. Imports use API calls and large imports can slow your storefront if they run during your busiest sales windows.
- Save your import file with the date in the filename. When something goes wrong two weeks later, you'll want to know which import did what.