Guide
How to bulk update Shopify inventory with a CSV
Last updated: October 11, 2026
Simple CSV sets Available inventory at one Shopify location from your file. You can upload a CSV for a manual update or schedule a file URL on Pro or Scale.
Each row needs an identifier for an existing variant and its inventory quantity. A variant is a specific version of a product, such as a shirt in size Medium.
Start with a template from your store.
Download a template with your current products
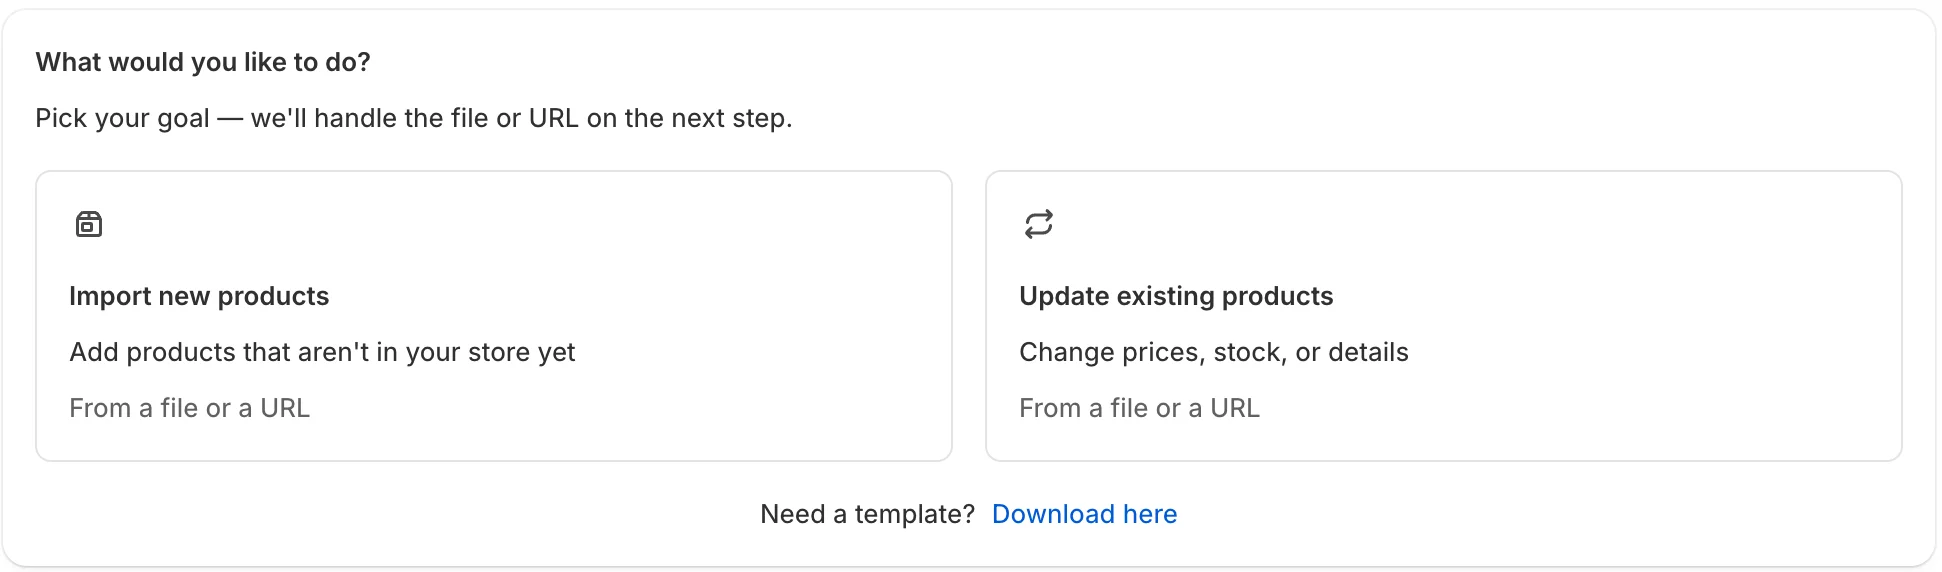
Open Simple CSV from Shopify Admin. On the dashboard, beside “Need a template?”, click “Download here.”
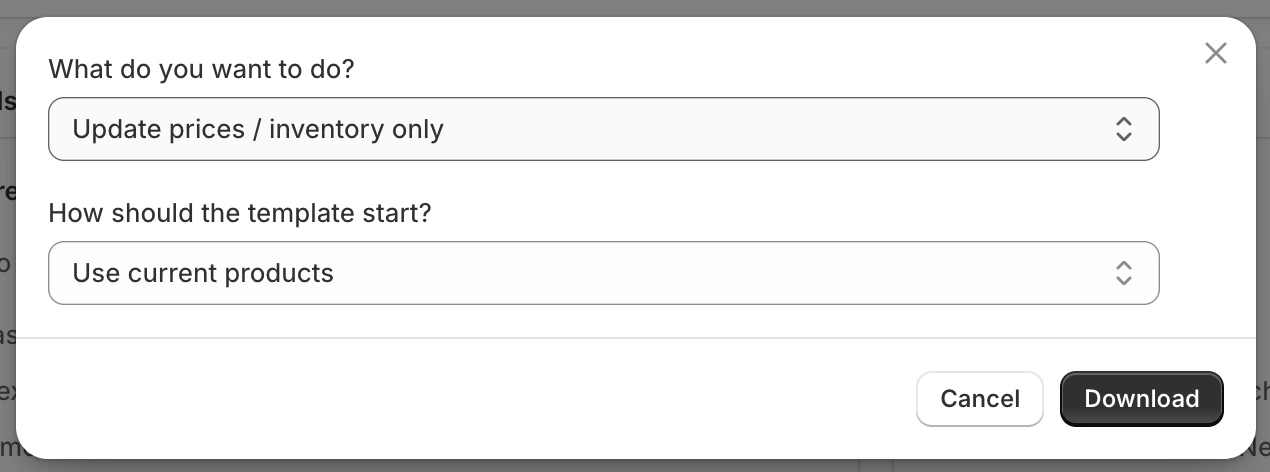
In the download dialog:
- Choose “Update prices / inventory only.”
- Under “How should the template start?”, select “Use current products.”
- Click “Download.”
The downloaded file contains these columns:
| Column | Purpose |
|---|---|
Variant ID | Shopify Variant GID, an identifier for one specific variant |
Variant SKU | Your variant’s SKU |
Variant Barcode | The first barcode on the variant |
Variant Price | Selling price |
Variant Compare At Price | Compare-at price |
Variant Inventory Qty | Inventory quantity to import |
For an inventory-only update, use one identifier column and Variant Inventory Qty. Remove the price columns or leave them unmapped during setup.
You can also use a supplier’s file. Its headings do not need to match the template because you map the columns yourself.
What the inventory number does
Map Variant Inventory Qty to “Inventory.”
The imported number sets the variant’s Available quantity at the location you choose. Available is the stock Shopify shows as available to sell.
A value of 0 sets that quantity to zero. A blank inventory cell skips the inventory update for that row.
Check those cells carefully. Zero and blank have different effects.
Match each row to a variant
Inventory updates require SKU, first-barcode or Shopify Variant GID matching.
Use SKU when each variant has a unique SKU. If you downloaded a template with your current products, its Variant ID column provides Shopify Variant GIDs.
Handle and Shopify Product GID matching only support product-level updates. They cannot update variant inventory.
Matching is exact, with case and surrounding spaces ignored
For SKU and first-barcode matching, Blue-Shirt matches blue-shirt. But SF-2000-SET does not match SF-2000-SET-CP.
If an identifier belongs to more than one product, Simple CSV skips the row. The import log records the identifier and the number of matches.
Only the first barcode on a variant can match. If your file contains a secondary barcode, use SKU or Shopify Variant GID instead.
Check for repeated identifiers in the file too. With SKU or first-barcode matching, rows run in file order. The last successful row determines the final value.
Keep leading zeros
Format SKU and barcode columns as Text before entering data in a spreadsheet.
An identifier such as 00412 is different from 412. If the spreadsheet removes that zero, the row may no longer match.
Run your first inventory update
1. Choose “Update existing products”
Open Simple CSV from Shopify Admin and select “Update existing products.”
This flow changes products already in your store. A row without a match is skipped. It does not create a new product.
2. Upload the file or enter its URL
Upload your edited CSV or enter a URL that returns the file.
A manual URL update is available on every plan. Scheduling requires Pro or Scale.
3. Map the inventory and identifier columns
Map your quantity column to “Inventory.” Choose how Simple CSV should find each variant, then map the corresponding identifier column.
For the downloaded template, use Variant SKU, Variant Barcode or Variant ID, depending on your matching choice.
Leave prices and other fields unmapped unless you intend to change them.
4. Choose the location
Select the Shopify location whose stock you want to update.
Each import targets one location. Quantities at other locations stay unchanged. Location selection is available on Free, Pro and Scale.
To update another location, run a separate update with that location selected.
5. Review the preview and start
Check the identifiers and inventory quantities before starting. Confirm the selected location too.
For a one-time URL update on Free, select “Start update.” For a URL source on Pro or Scale, select “Save & Run now.”
“Save & Run now” saves the setup and runs the file once. It does not create or change a recurring schedule.
After the update, review the import log. Check several variants at the selected location in Shopify.
Schedule recurring inventory updates
On Pro and Scale, Simple CSV can fetch your inventory file from a URL at scheduled times. You save the mapping and selected location with the automation.
Use this when your supplier or stock system keeps an inventory file at a URL. Update the file at its source, and the automation checks it at the next scheduled time.
Pro costs $19 per month and includes 3 automations that can run every 6 hours. Scale costs $49 per month and includes 7 automations that can run hourly. Both plans support unlimited rows per file.
Create the schedule
Prepare the URL update using the steps above. Map the identifier and Inventory columns, then choose the location.
On the Summary page, select “Save & Schedule” to create or edit the recurring schedule. Use “Save & Run now” when you only want one run.
Each automation targets its own location. Separate Pro or Scale automations can update separate locations.
An unchanged file is skipped
After a Pro or Scale automation’s last fully successful scheduled run, Simple CSV compares later files and settings with that run. If both are unchanged, it completes without updating Shopify.
The history shows “Completed.” Open the run to see “No changes in the file,” with all counters at zero.
This matters for inventory. If sales reduce stock in Shopify while the source file stays unchanged, the next scheduled run will not restore the file’s quantities.
Select “Run now” on the automation when you need to apply the same file again. That always processes it.
For supplier setup and optional Scale cleanup of variants missing from a feed, see our supplier-feed guide.
When a row does not update
Check its identifier first.
A missing leading zero can prevent a match. A secondary barcode cannot match either. If the identifier belongs to several products, the log reports the match count and skips the row.
Then check the Inventory cell. A blank cell skips the inventory update. A zero sets Available inventory to zero.
If the final quantity differs from an earlier row in your file, check for repeated SKUs or barcodes. A later successful row may have set another value.
Shopify’s built-in inventory CSV is another option
If you want to edit an inventory export from Shopify, we recommend starting with its built-in workflow under Products > Inventory.
Shopify’s recommended All states format uses On hand (current) and On hand (new). Keeping both columns lets Shopify check whether stock changed after the export. Affected rows fail validation rather than overwrite newer quantities. See Shopify’s inventory CSV instructions.
Simple CSV uses the workflow described above to set Available inventory. Its template is different from Shopify’s native inventory CSV.
Common questions
Can I bulk update inventory on the Free plan?
Yes. Free supports manual updates with up to 100 rows per file. Pro and Scale support unlimited rows per file and add scheduling.
Does the quantity add stock or replace it?
It sets Available inventory to the number in the file at the selected location. Zero sets it to zero. A blank cell skips the inventory update.
Can I match inventory updates by handle?
No. Use SKU, first barcode or Shopify Variant GID. Handles and Shopify Product GIDs only support product-level updates.
Can I update several locations?
Yes, with separate imports. Each import updates one selected location. A saved Pro or Scale automation also targets one location.
Can I use Excel instead of CSV?
Yes. Simple CSV accepts XLS and XLSX files. It reads the first worksheet only.
Start with your store’s own template
Install Simple CSV on Shopify, download a template with your current products and test a small inventory update.
More file workflows are available in our Shopify import guides.